fbpx

COROS VERTIX 2 – Full Review

When COROS debuted several years ago, it was a disrupter in the field of GPS watch categories. It’s impressive out-of-the-box features and battery life threatened to push Garmin and Suunto off their pedestals.

Three years ago, when I was researching the best GPS running watch I stumbled upon COROS on Instagram and decided to purchase their Apex watch.

This was after using the Apple Watch for a majority of my training. My biggest frustration with the Apple Watch was that I would have to charge it every night and for longer GPS excursions, it would die halfway through.

What made COROS stand out more than anything else was their battery life. And the Apex delivered. Even on heavy training weeks for ultramarathons, I could still go 15 days before I needed to recharge it.

And while it lacked some features that I missed with the Apple Watch (like being able to track non-GPS workouts), COROS’ team of developers started to deliver on those features with firmware updates.

COROS VERTIX 2
COROS VERTIX 2

The new VERTIX 2 landed last summer with a ton of new features, including music playback, dual GNSS functionality, full-color topographic mapping, ECG functionality, WIFI connectivity for updates, amazing battery life, and Insta360action cam controls. Externally it boasts a larger screen and titanium alloy bezels and case to survive any adventure.

I’ve been using the watch all day, every day for the past three months. It has been with me on trail runs, bike rides, ice climbs, gym rock climbing, road runs, backcountry skiing, indoor cardio workouts and indoor bike rides.

So, let’s dive in on why this watch is the best gps watch on the market.

VERTIX 2 Overview

The VERTIX 2 is a massive watch. I have skinny wrists and was a bit uncertain wearing this monstrosity 24/7 over the course of our testing period. And it did take some getting used to: both size and weight. But after the first week, it was as comfortable as the APEX.

On the right side of the watch (if you’re wearing it on your left wrist) there are two buttons and a separate digital crown (which rotates and can be pressed in).

The top button is used to turn the backlight on or off.

The bottom button has a number of functionalities. On the main screen, outside of a tracked activity, it can be tapped to cycle through metrics on the home screen or held to jump to the settings folder.

COROS VERTIX 2
COROS VERTIX 2

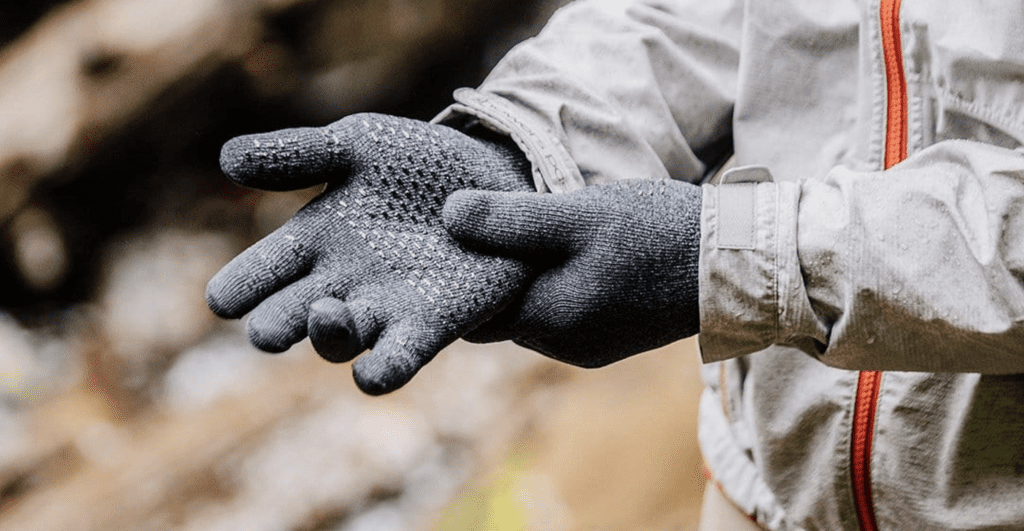
With the digital crown, if you press and hold, it will unlock the screen. This is much better than the unlocking function on the APEX. With the APEX, I had to turn the dial to unlock which was especially frustrating when in the middle of an activity, especially in the wintertime when I was wearing gloves.

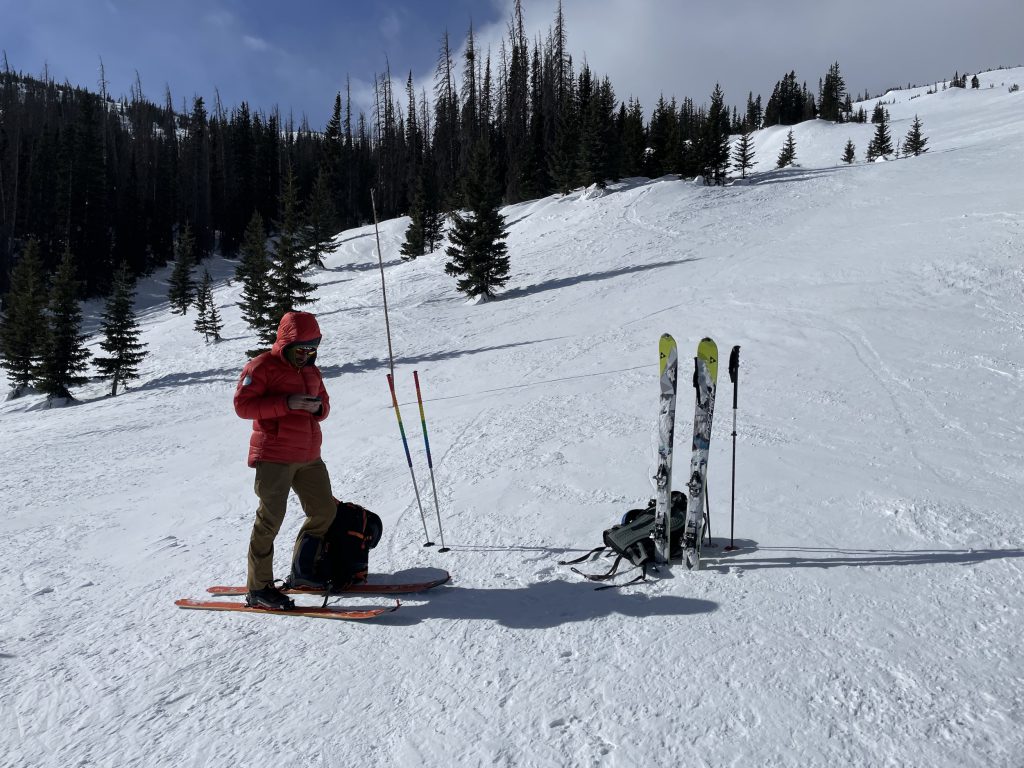
With the VERTIX 2, I found the crown easy to use, even when wearing gloves. When I was skiing in the backcountry, it was easy to shift between uphill and downhill tracking, as well as pausing for a snack break.

While in the middle of an activity, the digital crown can be used to cycle through your activity metrics. This is great for some activities (like indoor cycling or GPS cardio) when I am focused on duration and heart rate (trying to keep it in the fat burning zone).

While the touchscreen isn’t a new feature for COROS or GPS watches in general, it is still worth highlighting. It is primarily used outside of workout mode. You can click into widgets to slide through your metrics. Or pull up a map and move around easily.

I haven’t found myself using the touchscreen too much outside of the widgets. It is a much easier tool that the dial to cycle through and look at a particular time frame of data.

The watch bands connect using a quick release system. Again, this is a step up from the APEX. The tabs to pull and release are much easier to use, allowing you to swap out bands or remove them all together to connect to the COROS Carabiner so you can climb without the watch attached to your wrist.

On the back of the watch is the charging port and optical heart rate sensor. The heart rate sensor is the set of LED’s and optical sensors (bright and vibrant red and green lights) that measure your heart rate, but also blood oxygen levels and ECG data.

ECG / HRV Feature

To access the ECG feature, navigate to the settings menu and click HRV test. It’ll ask you to place your hand on the bezel.

And it’ll start the ECG, lasting for 60 seconds. Throughout you’ll feel a vibration, similar to a heartbeat. At the end you’re given a HRV value, not an ECG value. Which is confusing.

I’m unsure if this is a feature that will continue being developed.

The HRV value does show up in the app and you can watch the trend over time. The value is scaled from 0-100.

  • 81-100: Superior, relaxed

  • 51-80: High, under minor physical or mental pressure

  • 21-50: Medium, under medium physical or mental pressure

  • 1-20: Low, under significant physical or mental pressure
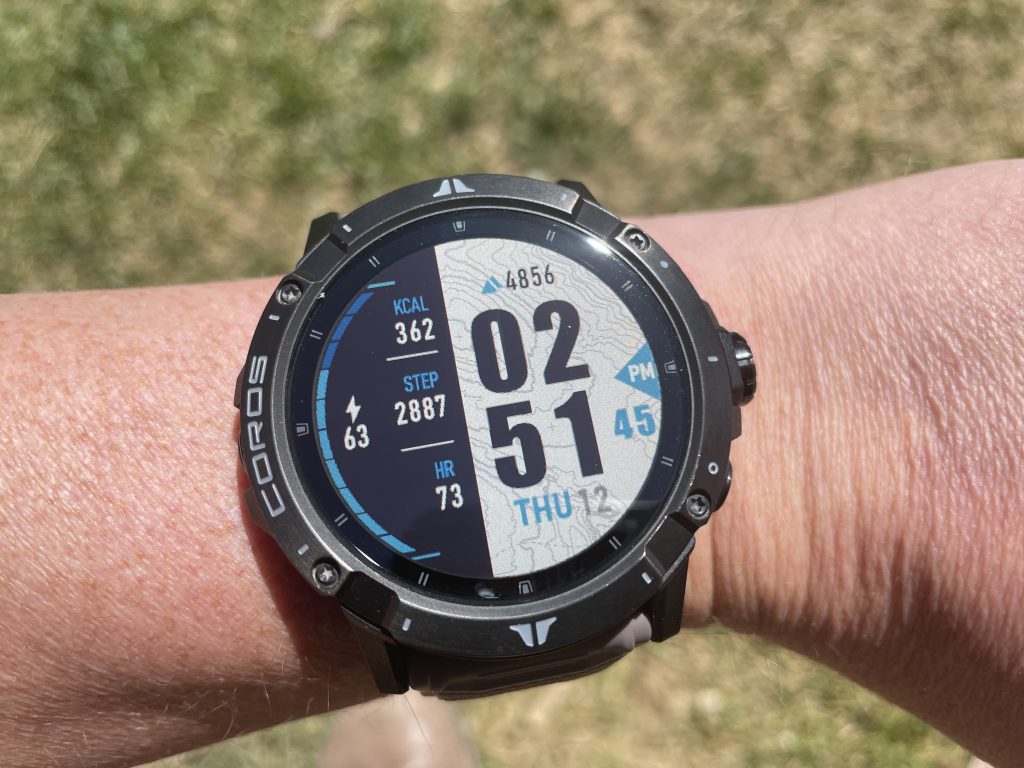
Widgets for Days

When you’re on the home screen, you can move into the widget menu by unlocking the screen and moving the dial.

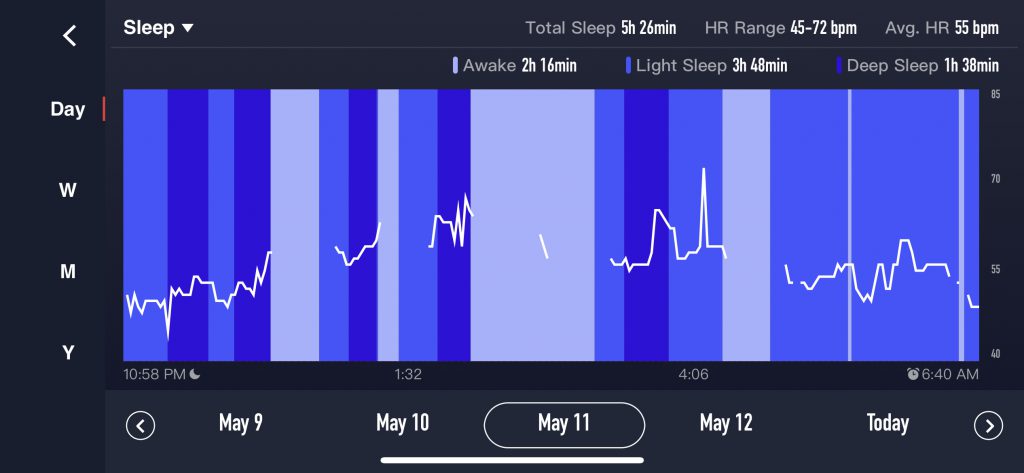
Widgets include everything from steps, KCAL burned, workout duration, recovery data, to sleep.

With each widget, you can click into with the dial and scroll through the data with the dial or your finger on the screen.

I have found that most of these widgets are pretty accurate. With the exception of sleep. I think it’s because of the size of the watch, but I have found that if the watch isn’t centered on my wrist that I will miss out on sleep data; viewable as large gaps of “awake” time during the night. Additionally, if I get up in the middle of the night for a bathroom break or to help an awake child, it will register that as the moment I awoke—not counting when I went back to sleep a few minutes later.

I slept like a rock, but COROS is registering a lot of awake time. More than likely because of the way the watch was positioned.

Notifications and Settings

One of the reasons I hated using the Apple Watch as a primary fitness watch was all the notifications I would get. Anything my iPhone received, so did my watch. Ping, ping, ping, ping, ping.

With Coros, I have the ability to be in the same predicament. But I am very conscious about the impact all those notifications have on my mental health, so I have a majority turned off. Right now, phone calls is the only notification I receive. Anything else can wait till I’m at my phone.

But it is fully customizable when you first setup the watch on the COROS app.

If you hold the bottom button, you can also access the settings menu. Here you can access the above mentioned ECG function. But you’re also able to connect to Bluetooth devices, WIFI, Insta360 action cam control, alarms, the compass, and music.

Music and Insta360 Cam Controls

The VERTIX 2 is COROS’s first watch to feature music. Bluetooth headphones are paired through the headphones menu in Settings. You can pair multiple Bluetooth headphones, which is a great feature for ultramarathons when you might burn through a pair or two.

Pairing is easy and once setup, they are easily accessible. When powered on, the watch will connect to them. When tested, it would take over the connection from my iPhone easily.

For music, the VERTIX 2 supports loading MP3 files to the device using a USB cable from your computer. Drag and drop the files you want to the “music folder” and you’re ready to start jamming by selecting the music menu from the settings menu.

You can use the touchscreen to play, pause, skip tracks, etc.

It should be noted though that you can only load MP3 tracks. Services like Spotify or Apple Music isn’t compatible and probably won’t ever be.

Now, at the time of testing, we couldn’t test the Insta360 controls. But to give an overview, if you have the Insta360 Go 2, One X2 and One R), you can control the camera with the VERTIX 2.

Using the dial, you can alternate between photo and video mode, then press the dial to take a photo or start recording a video.

Battery Life

COROS VERTIX 2
COROS VERTIX 2

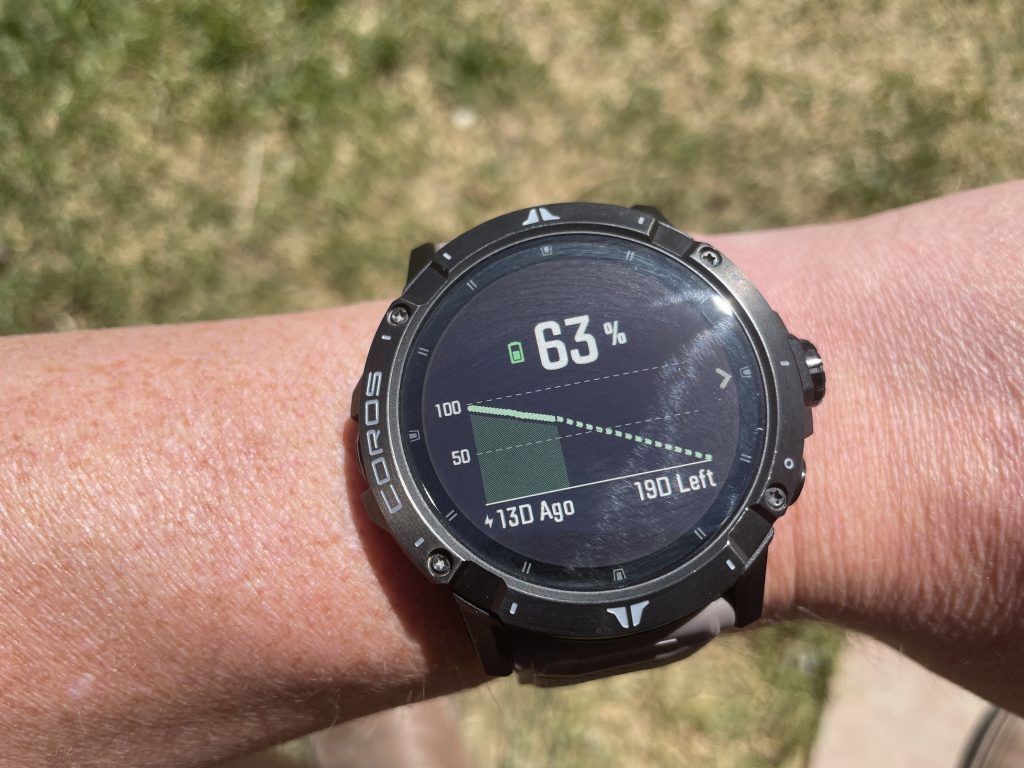
The VERTIX 2 lasts up to 140 hours of standard full GPS tracking and 60 days of normal use. With light GPS usage, daily workouts tracked, and with wearing the watch 24/7, I have gone 35-40 days between charges. During heavy usage periods, using GPS daily, I have gone 25 days between charges.

COROS VERTIX 2
COROS VERTIX 2

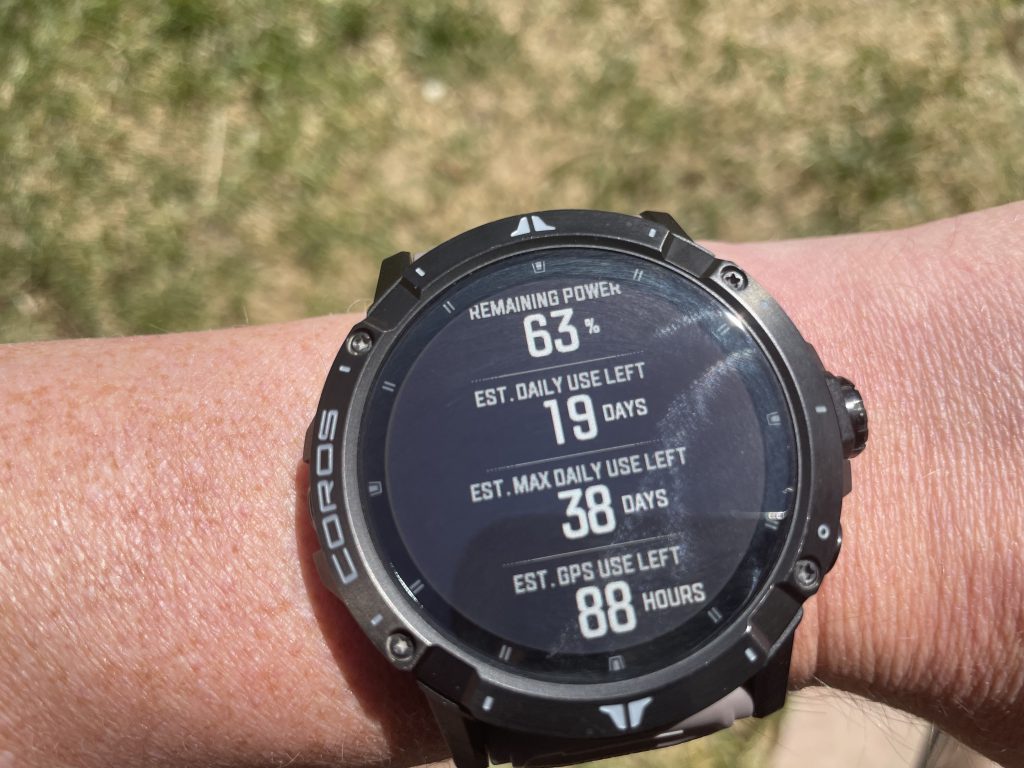
Some features, like the ECG/HRV test, music, and Insta360 camera control will drain your battery faster.

It should be noted that the VERTIX 2 uses a proprietary charger, so don’t lose it!

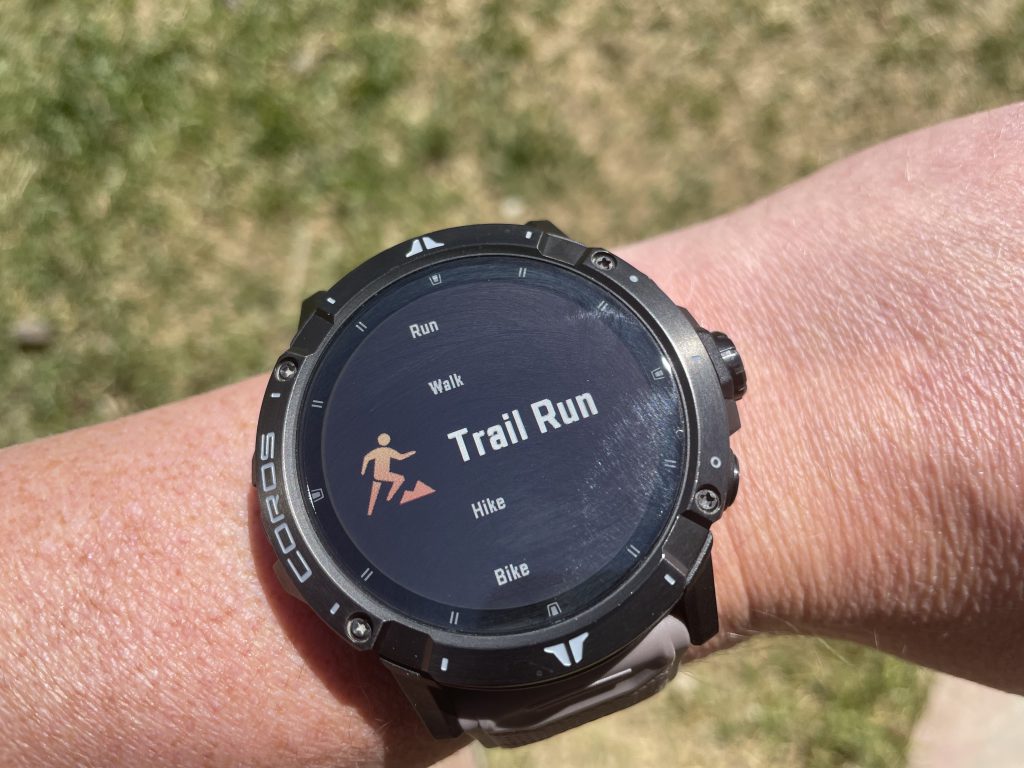
GPS Activity Tracking and Maps

During our testing period we took the VERTIX 2 everywhere: hiking, trail running, road running, road biking, trail biking, back country skiing, ice climbing, and most recently, paddle boarding (yay! spring has sprung!).

GPS accuracy can make or break a watch.

One of the biggest challenges I had with the APEX was that when I was doing trail races with a lot of vertical gains, the watch would think that I wasn’t moving and stop tracking.

COROS VERTIX 2
COROS VERTIX 2

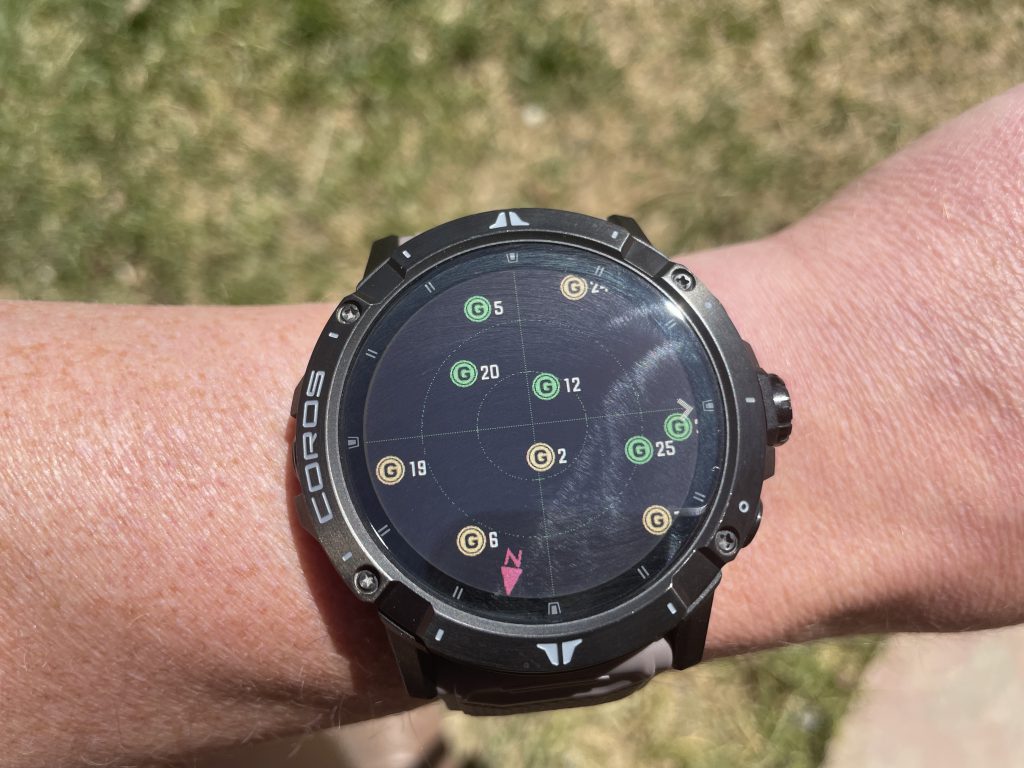
The VERTIX 2 has improved on this by offering Dual Frequency GNSS. This allows the watch to locate the best GPS frequency available from all five of the major satellite systems at the same time.

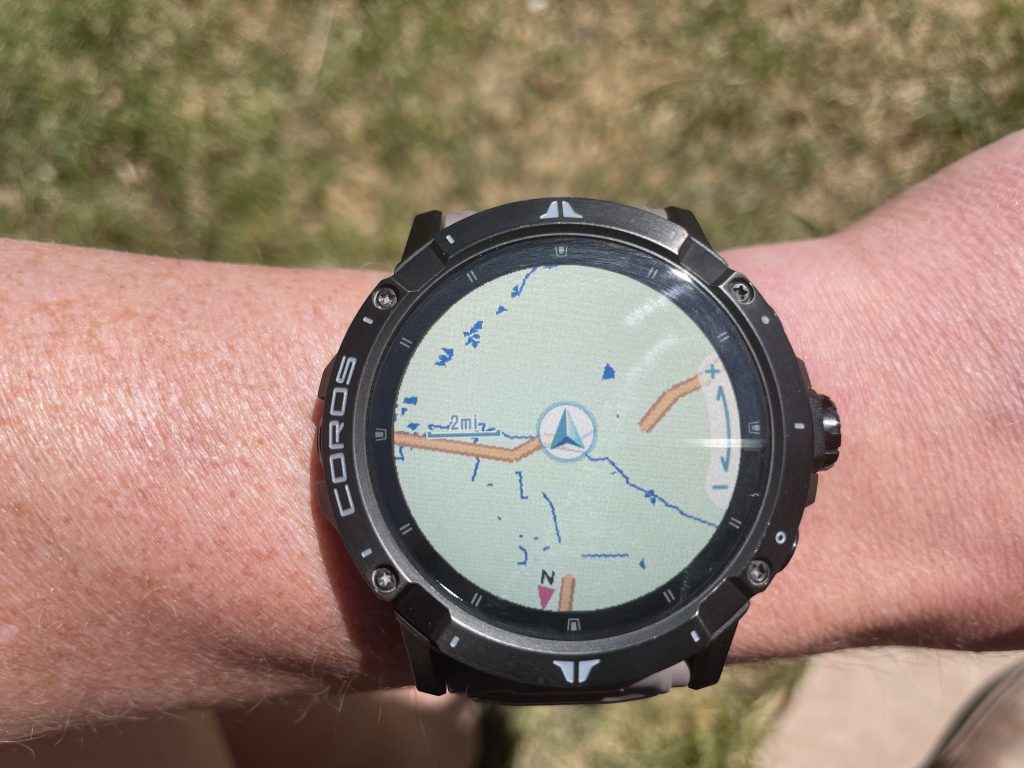
Additionally, navigation features include topographic, landscape, and hybrid global mapping. You can load a route by transferring it to the COROS app and loading it directly to the watch from the app. I used this feature in the backcountry and part of the challenge is that on the map there aren’t any labels or turn-by-turn directions. So it was challenging navigating back when I got off course and lost the trail.

COROS VERTIX 2
COROS VERTIX 2

When I looked at the routes tracked, I did find the VERTIX 2 to be pretty darn accurate, including in heavily wooded areas or terrain that had more vertical climbs.

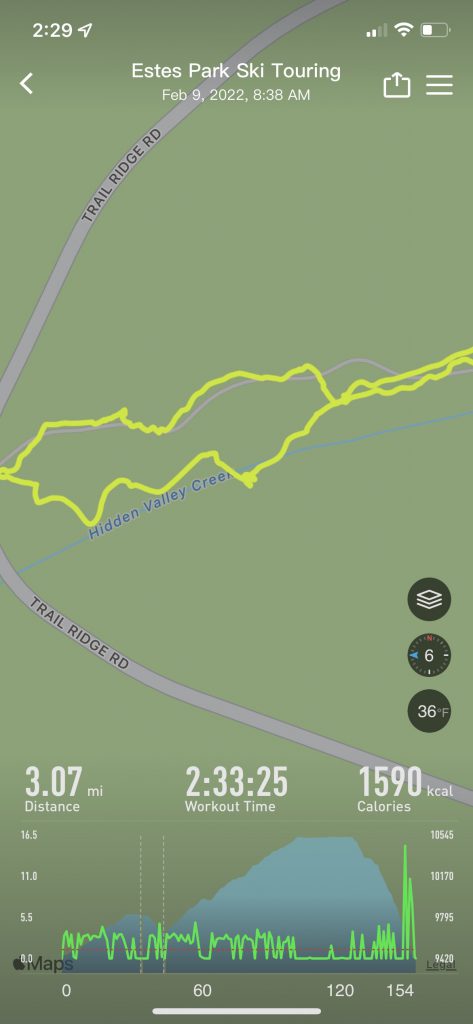
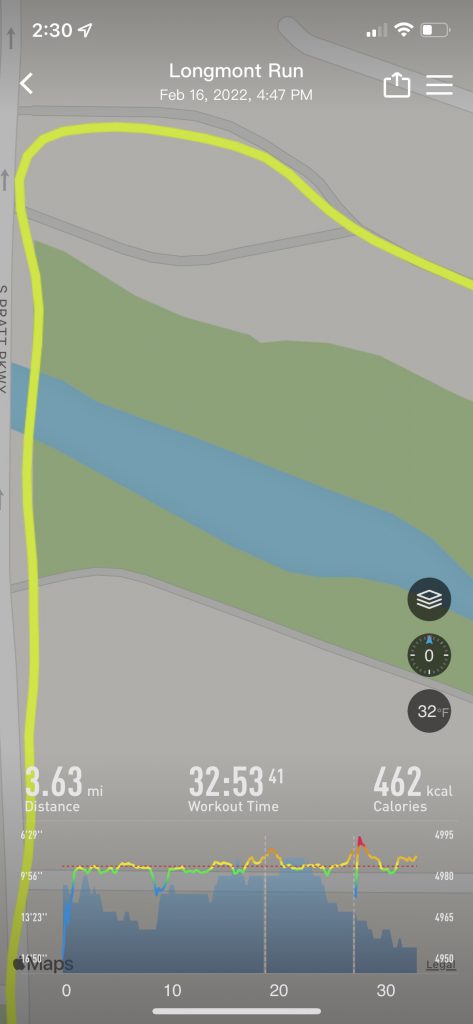
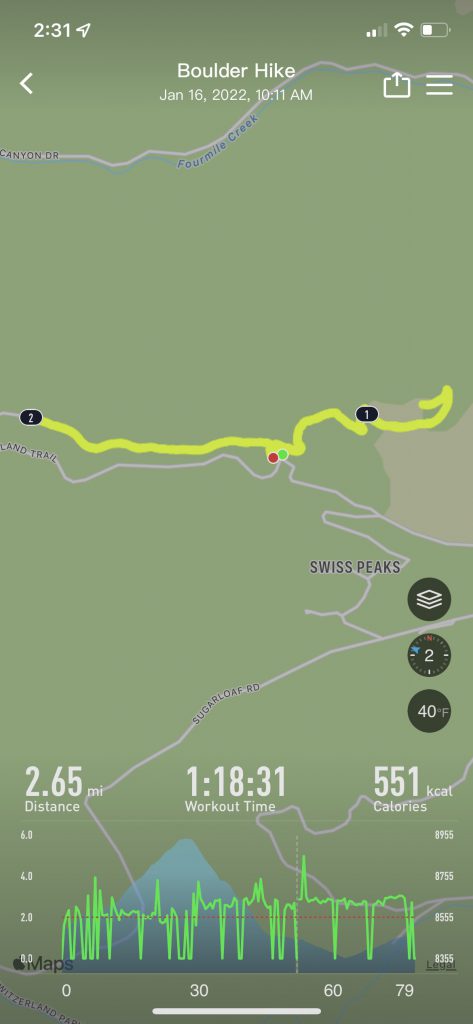
I highlighted a few examples to showcase the accuracy of the GPS data.

In the middle image, this was a point on my run where I transitioned from trail to sidewalk. While it didn’t show me directly on the trail, throughout it caught every little turn and pivot I made, including where I ventured off the paved trail onto a single track.

For the Ski Touring tracking, when I zoom in, you can see all the switch backs I went up.

What I am most impressed by is the fact that the watch is more accurately picking up trail runs on steep inclines. No longer is the watch auto-pausing because it can’t register movement. And that in itself is a huge winner for me as I continue training for ultras this Summer.

Conclusion

Throughout the testing period of the VERTIX 2, I continue to be impressed by the leap forward COROS has taken with this watch.

There are a ton of really awesome features with the music and Insta360 features.

But more than anything, the feature that is worth shouting about is battery life. There isn’t another watch on the market that can match COROS on what they were able to accomplish with the VERTIX 2.

Sure there are some improvements I’d love to see (especially with maps), but if there’s a company I trust to get it done, it’s COROS. Their developer team is amazing and based on what they have done in the last few years, I’m fairly certain they will keep the VERTIX 2 ahead of the competition

If you’re an endurance athlete or avid explorer, I have no doubt that this is the watch for you.

The COROS VERTIX 2 is available online and at several different retailers. It retails for $699.

Backcountry Skiing With 57Hours Guided Adventures

Something that had been on my Colorado bucket list was backcountry skiing.

I got the itch a couple years back when I went snowshoeing with a friend that opted to be on his skis instead. Every time I looked at him, it was obvious that he was having a much better time than me traversing the snow.

And a much easier time. There was a fairly long stretch where we had lost the trail and I was post-holing constantly—sinking up to my hip—while he skied past me with ease.

The second time backcountry skiing wormed its way into my brain was while driving through Loveland Pass. We kept passing parked cars on the side of the road and realized that they were skiers and snowboarders that were traversing the backcountry instead of the nearby Keystone Resort.

And when I saw those skiers and snowboarders, they looked like they were having a blast!

But backcountry skiing was a lot to bite off.

Where do I start?

How do I start?

Who could I go out with?

Enter: 57Hours

57Hours is a new site and app that connects people with guides for outdoor adventures. The goal of their platform is to provide a seamless experience for freelance guides and adventure seekers.

57Hours Homepage
57Hours Homepage

For clients, it eliminates the hassle of calling around to different guides and companies to find the appropriate scaled adventure, a guide that fits your need, and then all the craziness of coordinating dates.

57Hours matches adventurers with the best-fit guide based on need and skill level. Plus, choosing a day for your adventure is as easy as booking an Airbnb.

For guides, the app provides another avenue for acquiring new clients. Plus, they only take a small percentage of your guide fee.

Because of our own mission to connect people with the outdoors, we were beyond thrilled when 57Hours reached out for us to review their guide service.

The User Experience

Navigating the 57Hours website and app was a breeze.

When you first land on their site, you can select your ideal adventure type and location. You can also browse through all adventure types and locations to see the scale of their platform. You can choose to do something locally or all the way across the world.

For myself, I chose backcountry skiing and selected locations in Colorado.

The closest adventure opportunity to me was in Rocky Mountain National Park, so I chose that.

57Hours Trip Booking User Interface

As mentioned before, the user interface was very similar to Airbnb.

I selected dates that would work best and added a note for the guide about what I was hoping to get out of the experience.

Once I hit “continue,” I was taken through a checkout portal and had follow-up emails confirming my adventure and notified me that a guide would be in touch.

Pairing with a Guide

Based on my adventure, availability, and level 57Hours paired me up with a guide and pretty soon we began trading emails to lay out the details of the trip.

57Hours goes through a vetting process for their guides, so when they paired me with Max Lurie from Alpine to the Max, I knew I was in good hands.

Max was great at communicating and making sure that I felt comfortable going into this adventure.

I had a lot of questions about equipment and he was there, ready to answer every single one.

As we laid out details for the backcountry trip, he made sure that I knew exactly where we’d meet up, confirmed that I had all the equipment I needed, and helped me rent additional equipment.

Since we were heading into the backcountry of Rocky Mountain National Park, it was important that I rented appropriate skis, skins, poles, boots, and avalanche gear that included a shovel, probe, and tracker.

So far, the experience had been great.

As a newbie to backcountry skiing, I felt that I was at a place with my guide that I trusted him and I trusted myself and my ability to go out, have a good time, and not die.

The Day Of

Finally, the day had come. Time to go out into the backcountry.

I met Max at the entrance of Rocky Mountain National Park and we drove in. After about 15 minutes we reached our destination: the Hidden Valley trailhead.

We spent some time at our cars making sure the gear worked. Max walked me through how to use my tracker and showed me how to put the skins on my skis.

Backcountry Skiing in Rocky Mountain National Park

The trailhead, at the very base, was flat, so we spent some time familiarizing me with the motion of backcountry skiing, which took a while to catch on. It’s very different from regular skiing and you can’t use the same motion as snowshoeing or hiking.

“Pick up your heel and glide,” I kept telling myself.

Once I had enough confidence in the movement, we started up on the trail.

When we reached switchbacks, Max paused again and showed me how to turn while on a vertical incline.

And we continued on.

Soon we reached the top of a small hill and after removing the skins, Max used that opportunity to check to make sure I could ski well enough.

It was at that point I realized that my ski boot rentals weren’t going to cut it. If there is one lesson here, it is to make sure your equipment is the right fit before you get out to the slopes. My boots were too tight and when I tightened them for downhill skiing my foot would cramp. For this test slope, it wasn’t so bad though. My foot was relieved when I made it down and loosened the boot for backcountry skiing.

Putting skins on

Once skins were back on, we continued on, going up about a mile until we reached the snow covered Trail Ridge Road.

We hydrated and refueled and it was time to ski down.

Throughout the entire process, Max was extremely knowledgeable and patient.

When we made it back down to the cars, we had some time left and Max took the opportunity to do some basic backcountry avalanche training. He familiarized me with my rental equipment and we practiced beacon retrieval.

Conclusion

Overall, this was a great experience.

Getting the experience in the backcountry and avalanche training is something I’ll be able to carry with me and use during my next adventure.

And I know that I wouldn’t have done this without having someone like Max to guide me.

57Hours made is easy to find a guide and an adventure that was a good fit. If you’re wanting to get outdoors for an adventure, but not sure where to start, checkout 57Hours. You won’t be disappointed.

Ibex Woolies 2 Base Layers Review

We recently covered Ibex’s Woolies Tech Crew and Bottoms.

Since that review, Ibex launched their new Woolies 2 Base Layers and sent us a pair to test in the snow.

Ibex Woolies 2 Crew
Ibex Woolies 2 Crew

Ibex’s Woolies 2 Base Layers differ from the Woolies Tech in that they are 100% merino. They are a bit heavier, and more insulating as well at 240gsm. If you’re heading out for long hours in colder weather, the Woolies 2 is going to be your best option.

Ibex Woolies 2 Bottoms

For testing, I took them out in a variety of conditions: trail-running, snowshoeing, and back country skiing. I found that during low-impact activities (showshoeing or skiing downhill) that these were the perfect match. I wasn’t too hot or too cold. But during heavier activities (trail-running and the ski ascent) they were too much.

For skiing, I had paired up the base layers with a mid-layer, shedding the mid-layer about halfway up to regulate my body temperature. When I had taken the Woolies Tech out into the backcountry, they were light enough so that when paired with a mid-layer, I felt perfectly comfortable.

Ibex Woolies 2 Bottoms

One thing I’ll note with the Woolies 2 Bottoms was that no matter how heavy or light the activity was, I didn’t experience any chafing in the nether region.

There’s a lot to be said about why the Woolies 2 perform so well and it’s in part due to the magic of Merino wool. As mentioned in the previous review, Merino is a natural, high-performance fabric, in part because of the conditions these sheep live in. Winters can be below zero and summers as warm as 95ºF. The sheep’ coats have evolved so that the fibers react to the changes in body temperature. And this natural technology is passed along to its human wearers.

During a cold spell in Colorado, with temperatures dipping to -12ºF, I started to wear these base layers everyday. Even when I wasn’t playing outside, I wore them throughout the day for work, typically paired with a pair of jeans and flannel.

Ibex Woolies 2 Crew
Ibex Woolies 2 Crew

And they were extremely comfortable. If you’re in the camp of “Oh no, wool is so itchy!” you have to try Merino. It doesn’t itch and is so comfy and cozy.

Given that they regulate my body temperature so well, I also found these to perfect base layers to transition from the slopes to the ski lodge in. They weren’t wet from sweat and the natural odor control Merino has kept them from being stinky.

For the test, I wore a size large in Men’s. I am 5’11” and 180 pounds and it fit really well.

For information, you can head over to ibex.com. The Woolies 2 come in Men’s and Women’s sizes.

COROS VERTIX 2 Unboxing, Setup, and Interface/Menu Walk-Through Video

Today we are doing an unboxing and initial setup and thoughts on the COROS VERTIX 2

I am a big fan of COROS. When I was looking for an outdoor adventure watch three years ago, I did a ton of research; looking at the top brands, trying to decide which would be the perfect watch for me.

COROS was new to this category in 2018, but was already shaking things up in an industry that was dominated by Garmin and Suunto. In 2019, I purchased their Apex 46mm watch. What won me over was their unmatched battery life and their developers. They were churning out multiple firmware updates a year—building on an already impressive design—and really engaged with their community; listening constantly to feedback from users.

And three years into it, the Apex is still a solid watch. I can still go between 10-14 days between charges and the firmware has only gotten better with their major releases.

COROS sent me their latest watch, the VERTIX 2, to put through our testing protocols. Their goal with this watch was to make the ultimate adventure watch. Check out our video and let us know your thoughts.

Did they succeed?

We’ll dive in further in a later video.

Bundle Up With Ibex Base Layers

When it comes to winter outdoor activities, bundling and layering is key. And choosing the right base layer is an important first step.

One of the best fabrics to use for base layers is Merino Wool. Merino is a natural, high-performance fabric, in part because of the conditions these sheep live in. Winters can be as cold as -4ºF and summers as warm as 95ºF. Their coats have evolved so that the fibers react to the changes in body temperature. And this natural technology is passed along to its human wearers.

Ibex sent us their Woolies Tech Crew and Woolies Tech Bottoms to test this winter.

Ibex Men's Woolies Tech Bottoms
Ibex Men’s Woolies Tech Bottoms

Ibex’s Merino Wool comes from Australia and New Zealand. They implement the high standards in farming, making sure their sheep are treated with respect and best practices are in place to protect the land the sheep live on.

Ibex is also part of the Climate Neutral community of businesses. The apparel industry as a whole accounts for 10% of global carbon emmisions and remains the second largest industrial polluter. Ibex measures their carbon footprint and partners with their supply chain to reduce where they can and offset the rest.

Why Ibex Merino?

Merino Wool keeps the body cool during even the most strenuous activities by trapping moisture and releasing it as vapor before it turns to sweat.

Ibex Men's Woolies Tech Bottoms
Ibex Men’s Woolies Tech Bottoms

During testing, I wore the Woolies Tech Crew on a chilly morning run. Normally, with other moisture wicking fabrics, I would end a run like this sweaty and, in those spots in the fabric with sweat, cold. With Ibex’s Merino Wool crew, I found myself relatively dry and comfortably warm by the end of the run.

Because Merino Wool is able to regulate your temperature, it also stops odor-causing bacteria to form, so you also don’t have to worry about smelling funky after exercise.

If I wasn’t working from home these days, these base layers would be great for commuting to the office on my bike. I could easily go from my bike to my desk and still look and smell good.

Merino Wool also offers natural sun protection. The Woolies Tech Crew and Woolies Tech Bottoms offer UPF 50, while some of their lighter products offer UPF 25.

Finally, as sustainable a fabric as Merino is, as the end user, we are also encouraged to be sustainable in our care of the fabric. Because it’s odor and sweat resistant, it’ll stay cleaner for longer, which means that it doesn’t have to be washed after each activity.

For testing, I put in around 25 hours of activity before I felt that I needed to wash them.

Woolies Tech Crew and Woolies Tech Bottoms

I was really impressed by the performance of both of these products.

When I mentioned to my wife that I was testing out Merino Wool base layers, her first response was, “OMG, wool? It’s so itchy!”

But guess what? It’s not.

Ibex’s Merino Wool is the finest wool you can get. I found Ibex’s clothes to be soft on my skin and never itchy or irritating (even against a relatively fresh tattoo). On their site, Ibex shares that their fabric is ideal for people with Eczema or who have found cotton or other performance fabrics irritating. I have other Merino Wool products and I swear that Ibex outperforms them on comfort.

Ibex Men's Woolies Tech Crew
Ibex Men’s Woolies Tech Crew

The Woolie Tech Crew and Bottoms are 81% Merino and made with Ibex’s “Pro-Tech” fabric.

On the Woolie Tech Crew fit comfortably. When I paired it with a running vest, I found that the neck was structured so that I didn’t have any rubbing from my running vest. Additionally, it has optional thumbholes, which is a feature I love. When I was out running, I got to a point where my gloves were too much, but I still needed something to keep my hands moderately warm.

The crew laid close to my skin, but didn’t feel tight. I was able to pull up the sleeve easily to adjust settings on my sports watch.

The Woolie Tech Bottoms were great as well. I took them out on a wintery run as well; pairing them with a pair of running shorts over them. My legs were comfy and cozy throughout.

Ibex Men's Woolies Tech Bottoms
Ibex Men’s Woolies Tech Bottoms

Now, the most ideal winter activity to test these products in is skiing (or snowboarding).

I paired these up with a mid-layer and a hardshell.

I was slightly concerned I would get overheated, but I was comfortable for the several hours I was out on the slopes. Even after I got back to the ski lodge and shedded layers, I found that the Ibex base layers were still mostly dry.

Summary

I’ve been a big believe in Merino Wool for a while, but it wasn’t until trying Ibex’s products that I was in love with the fabric. I keep finding myself looking for reasons to put them on.

Heading out for a run? Ibex is coming with me.

Going snowshoeing? Ibex is joining me.

Lounging around in the house? Ibex, hands down.

Both products tested were larges. I am 5’11” and 185 pounds. You can find these along with many other options at Ibex’s website.

Outdoor Research Skytour AscentShell Kit Review

Outdoor Research sent our team their Skytour AscentShell Bib and Jacket to test. It was perfect timing because ski season had just started.

Outdoor Research Skytour AscentShell Kit

The Outdoor Research Skytour AscentShell Kit uses a proprietary waterproof/breathable membrane to provide top-of-the-line weather resistance. The Bib and Jacket combo is the most breathable water-resistant hardshell we have tested. It is comfortable to wear and stretchy. It has a lot of features, making it a great choice for backcountry skiers.

Breathability

Outdoor Research Skytour AscentShell Kit

The Skytour AscentShell Bib and Jacket provides little warmth. The shell is thin and allows air to pass through the fabric, so that as you’re moving up through the backcountry and working up a decent sweat, warm air can escape easily. This kit needs to be paired with insulating mid- and base-layers (such as the recently reviewed Ibex Baselayers). The warmth of this bib and jacket is comparable to a pair of hiking pants or a heavy rain jacket. But this lack of warmth is ideal for anyone that is wanting to ski hard and elevate their heart rate.

It also has several vents that were easy to unzip and zip with gloves on. This provided additional breathability and didn’t compromise the waterproofness.

Waterproofing

When we tested how waterproof this product was, it held up over our half-day excursion in the backcountry. Outdoor Research’s proprietary waterproof/breathable membrane is called “AscentShell” and is built in the bib and jacket. Both products are fully seam-sealed and the zippers are waterproof. The hood on the jacket provides good coverage, but it didn’t fully cover my ski helmet. Additionally, the bib’s legs are wide enough to fully cover my ski boots while providing enough coverage so snow didn’t pack inside the leg openings.

The Fit

Many of the hardshell jacket and bibs we tested were stiff and didn’t allow for a lot of movement. During testing, we found that the Skytour AscentShell Kit didn’t have that problem. The material is soft and stretchy and the brushed interior fabric is light on the skin. On the jacket, there is a fleece-lined chin guard, which provided an extra layer of comfort.

Outdoor Research Skytour AscentShell Kit

The fit is straight-cut which was perfect for my body-size and accommodated my mid- and base-layers.

I also found that the jacket and bib weren’t noisy. When I’m out in the backcountry, I enjoy the stillness the snow brings, and crinkly and noising hardshells can easily ruin that serenity.

Skytour AscentShell Kit comes with a lot of pickets that were easy to access and use. On the jacket, the two hand pockets and two external chest pockets provided tons of storage. The jacket’s left sleeve pass pocket was useful for accessing RFID turnstiles without stalling. On the inside, it has a mesh stash pocket and another zippered chest pocket. I was able to easily store and access snacks and my iPhone.

Conclusion

Outdoor Research Skytour AscentShell Kit

If you’re looking for hardshell jacket or bib or both, the Skytour AscentShell Kit is a great value. It provides terrific weather and water resistance at a much lower price. Plus, it has some amazing features and storage. If you’re heading into the backcountry, this jacket and bib will be the perfect companion for you.

The Skytour AscentShell Kit is available in Men’s and Women’s sizes. I am 5’11” and 185 pounds and I wore a large in both the bib and jacket comfortably.

Crosspoint Waterproof Knit Wool Gloves Review

It’s no secret, our team at Huck Adventures loves Showers Pass. They are a go-to for many of our adventures; big or small.

Crosspoint Waterproof Knit Wool Gloves

They recently sent us a pair of their Crosspoint Waterproof Knit Wool Gloves to try out.

The Crosspoint Waterproof Knit Wool Gloves are fully waterproof. It is constructed with three bonded layers, including a wear resistant exterior, a waterproof / breathable Artex membrane, and a lovely merino wool lining. This merino wool lining is something special. It is soft and cozy, but even with the heart rate pumping, offers great temperature regulation while providing anti-microbial properties to keep it smelling fresh.

So far this winter, I’ve taken these gloves running and snowshoeing.

While running, I found that the merino wool lining performed as expected. Even on longer runs, as I warmed up, I found myself keeping the gloves on longer. Typically, I would oscillate between having gloves on our off, regardless of the temperature outside. But with my body temperature better regulated, I didn’t have those issues.

While snowshoeing, these gloves paired well with another Showers Pass product: the Crosspoint Flip Mitt. I was able to open the mitt and have the dexterity of my fingers in the Crosspoint Waterproof Knit Wool Gloves.

The gloves also became my go-to this winter for walking the dog. With the fit and dexterity, I was able to pull out the poo bags, open them, and pick up the little doggie droplets with easy. That might seem like a small thing, but with my other gloves, I’d always have to pull them off in order to perform this activity.

This winter, I also picked up a new daily routine: outdoor ice baths. Every morning, I’ll sit in a horse trough full of icy water in my backyard for 3-4 minutes. I’ll wear the Crosspoint Waterproof Knit Wool Gloves during this time, resting my hands on the outside of the bath.

And I can attest to how waterproof these gloves are. My dog loves to chew on ice. Throughout this morning ritual, I’ll dip my fingers into the bath and pull out chunks of ice and throw it to him to play with.

These gloves are terrific and my go-to this winter.

I consider my fingers normal sized and wear a large comfortably.

Cozy Up This Winter With Selk’Bag Human Shaped Sleeping Bag

When it comes to Winter, I love being outdoors: skiing, hiking, snowshoeing, trail-running.

But after spending a few hours in cold conditions, I always have a heck of a time warming up.

Likewise, when I’ve done winter camping, the only time I am truly warm is when I am buried inside my sleeping bag. And, as you know, sleeping bags are great for sleeping in and not much else. You’re essentially a human burrito capable of rolling from side to side without much freedom of movement.

When Selk’Bag reached out for Huck Adventures to review their wearable sleeping bag, I was 100% game.

Selk'Bag Wearable Sleeping Bag
Selk’Bag Wearable Sleeping Bag

The Selk’Bag is a human-shaped sleeping bag. It has openings for arms and legs. You can walk, run, and jump around easily in it, but you can also sit cozily reading a book or stand cooking a meal.

The Selk’Bag has pockets for days, including a kangaroo style pouch in the front that’s perfect for resting your hands or holding essentials like your smartphone. It also has a cargo pocket on the side.

It comes several zippered ventilation openings: on both legs and on the waist so you can access your pant pockets.

There’s an adjustable hood with a built-in balaclava for additional warmth and protection.

Selk'Bag Wearable Sleeping Bag
Selk’Bag Wearable Sleeping Bag

For additional warmth and coziness, the Selk’Bag also has elastic hand covers that slip on and off easily. And it has removable booties—perfect for sleeping in.

The Selk’Bag is filled with synthetic insulation that mimics the properties of down clusters, which kept me extra toasty while wearing it.

Selk'Bag Wearable Sleeping Bag
Selk’Bag Wearable Sleeping Bag

For testing, I wore it after a few high-country trail-runs. Once I got back to my car, I stepped into the Selk’Bag before driving back home. Typically after cold runs like this, I spend a majority of my time shaking, trying to regulate my temperature. But with the Selk’Bag on, within a handful of minutes I was comfy and warm.

With the ventilation openings, I was able to open them easily while I was driving when I got too warm.

I also tested this product at home over several days when I had a breakthrough case of COVID. For 72 hours I was cycling an on and off fever and body aches. When I had chills and couldn’t stay warm, I turned to the Selk’Bag. It was cozy enough that I fell asleep on my couch seated upright, the hood acting as a pillow of sorts.

Selk'Bag Wearable Sleeping Bag
Selk’Bag Wearable Sleeping Bag

One other thing I’ll note is the sizing. I am 5’11” and 185 pounds. According to their sizing chart, a Large fits up to a 5’11” adult, but I found it too tight in the crouch. When I did simple movements like sitting, I felt that I might tear the fabric. So I sized up to an XL that fits up to 6’4″. This size was comfortable and I was able to move freely, but I had to roll the sleeves and legs so that it fit better.

I am looking forward to taking the Selk’Bag with me on my next winter camping excursion. This has become a trusted partner to keep me warm on the coldest of days. It is rated between 44ºF to 35ºF, but I did test it in 20ºF temperatures for two hours and stayed comfortable.

The Selk’Bag model I tested was their Original Recycled. They have several models to choose from, including ones for kids.