In the unforgiving terrain of Colorado, where winter storms can descend with little warning, the Tracksmith NDO Tights prove to be an indispensable ally for trail runners braving the elements. True to their name, NDO, which stands for “No Days Off,” these tights are engineered to ensure you never have to skip a run, regardless of the temperature or weather conditions.
Tracksmith NDO Tights
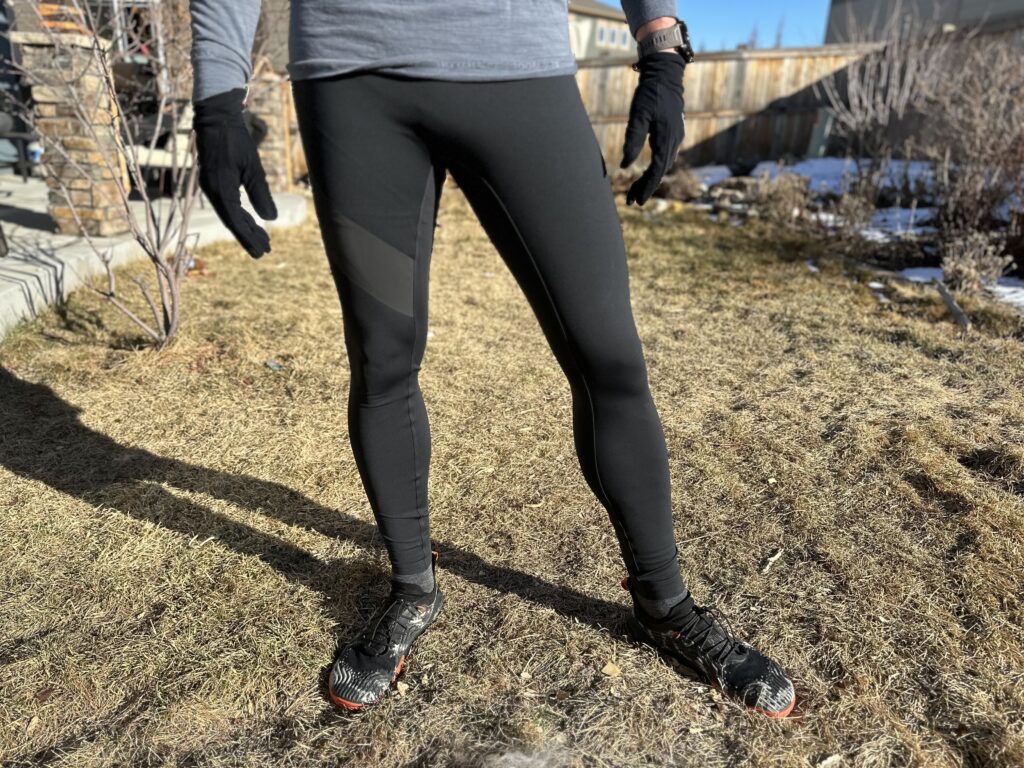
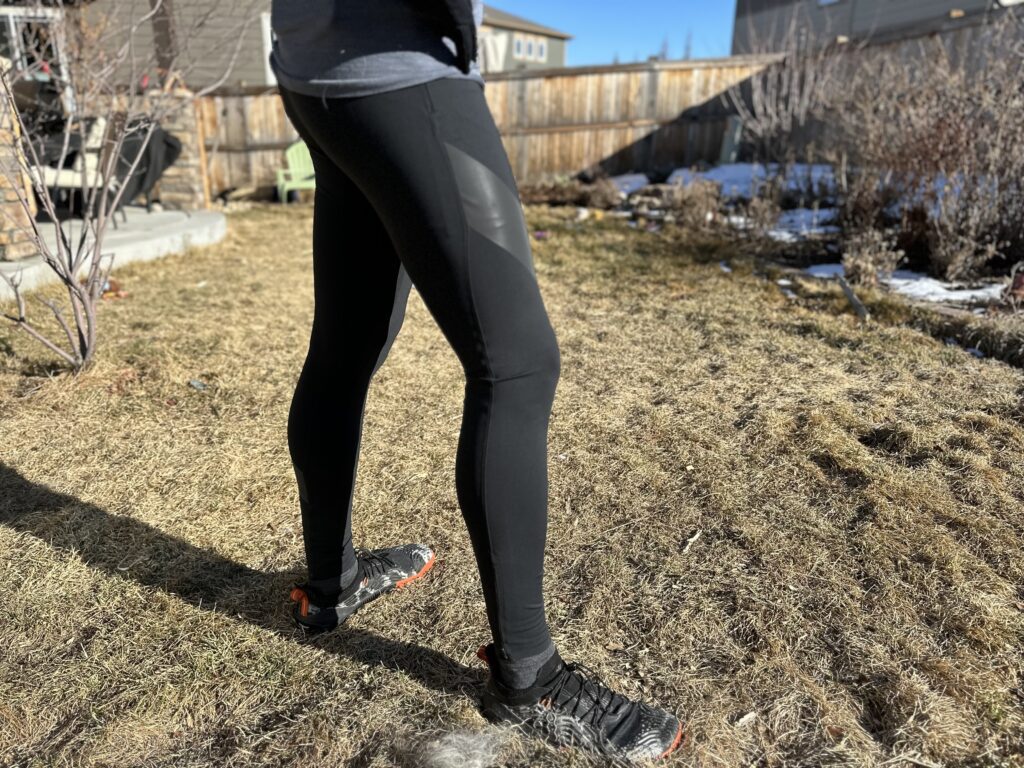
When the icy winds start to howl and the snow begins to fall, the NDO Tights step up to the challenge with unparalleled protection and comfort. Constructed from a double-layered fabric, these tights provide a cozy barrier against the biting cold, while the wind-blocking overlay at the front thighs shields you from the harsh elements. Unlike thin, flimsy tights that leave you shivering, the NDO Tights feel substantial and warm, allowing you to maintain your focus and performance even as the temperature drops.
Venturing out for a nighttime run in Boulder’s rugged terrain can be daunting, but with the NDO Tights, visibility is never a concern. Thanks to the innovative 360-degree reflectivity developed by 3M, these tights ensure you stand out in low light conditions, providing added safety and peace of mind as you navigate the trails after dark. The reflective sash, strategically placed on the right thigh and back left calf, ensures you remain visible from all angles, making nighttime runs both safe and enjoyable.
Tracksmith NDO Tights
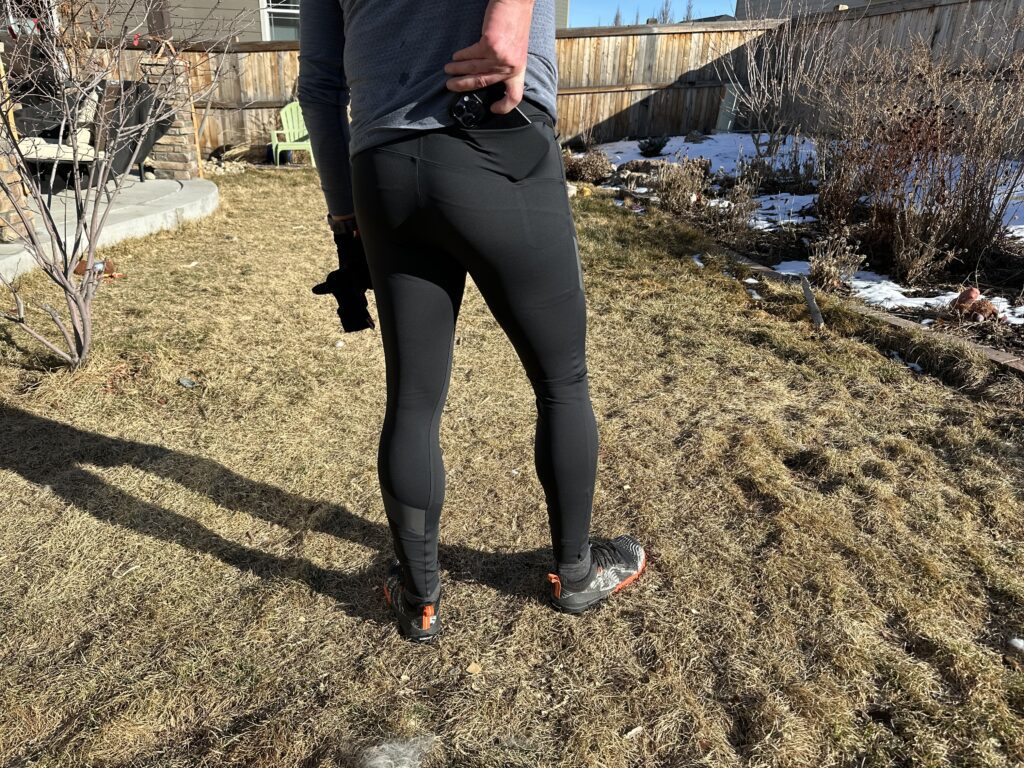
What truly sets the NDO Tights apart is their thoughtful design and attention to detail. From the soft elastic waistband that allows for easy layering to the strategically placed pockets for storing essentials, every aspect of these tights is engineered to enhance your comfort and performance. Whether you’re stashing gloves or gels in the envelope pockets or securely storing your phone and keys in the side zippered pocket, the NDO Tights have you covered for all your trail running needs.
Tracksmith NDO Tights
In the midst of a winter or under the cover of night, the Tracksmith NDO Tights prove to be a reliable companion for trail runners seeking comfort, warmth, and visibility. So, if you’re ready to tackle the trails with confidence, regardless of the weather conditions, look no further than the NDO Tights. With their unbeatable performance and thoughtful design, these tights ensure you never have to take a day off from your passion for running.
The Murph Challenge is an annual fitness event that pays tribute to Lieutenant Michael P. Murphy, a United States Navy SEAL who sacrificed his life during Operation Red Wings in Afghanistan in 2005.
This challenge has become a popular way for individuals around the world to honor and remember fallen heroes on Memorial Day.
The Murph Challenge consists of a grueling workout that includes a one-mile run, 100 pull-ups, 200 push-ups, 300 air squats, and another one-mile run—all done while wearing a weighted vest.
There are variations. GoRuck, in 2023, published their version of the Murph, which traded out the 100 pull-ups for 100 bent over rows using either 40 or 60# sandbags. Due to a shoulder injury, this is the version I completed this year.
This intense physical test pushes participants to their limits, testing their strength, endurance, and mental resilience.
2023 Murph Challenge
This was my first year training for and completing the Murph Challenge.
Completing the Murph Challenge requires not only physical preparedness but also the right gear and equipment to enhance performance and provide necessary support.
From weighted vests to durable footwear, the products used during this challenge play a crucial role in helping participants achieve their best results.
In this product review, we will explore several items that Huck Adventures received from the brands below to test.
And we put them to the test while training and during the Murph Challenge, evaluating their functionality, comfort, and overall performance. Whether you’re a seasoned athlete or a first-time participant, finding the right gear can make a significant difference in your Murph Challenge experience.
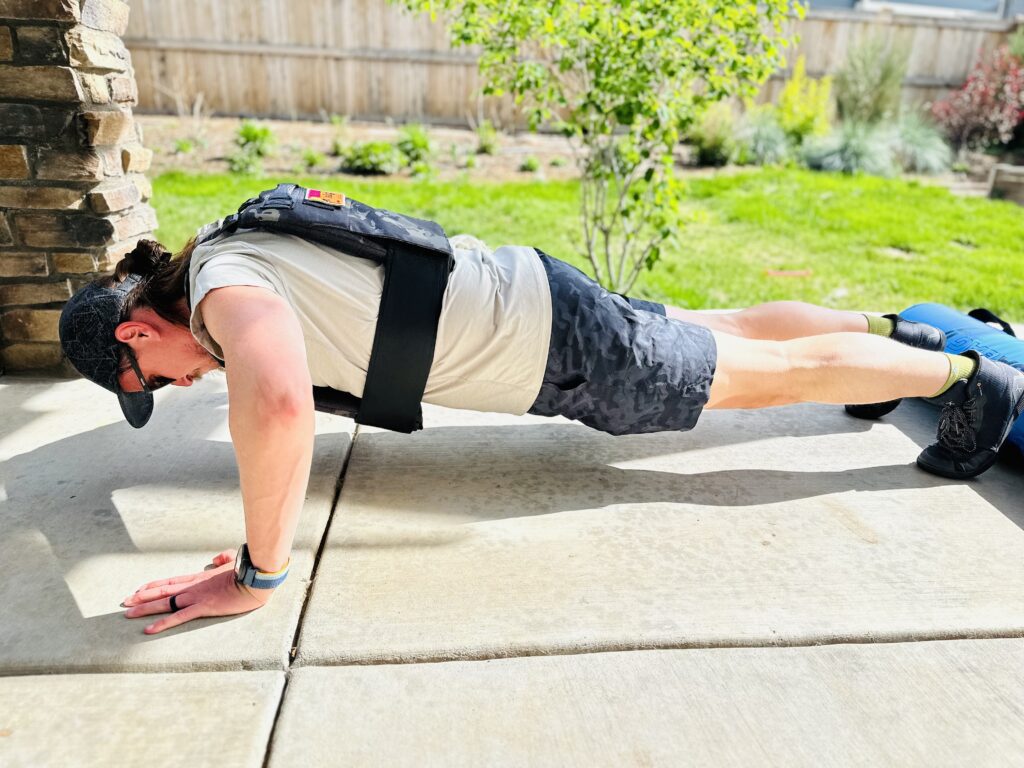
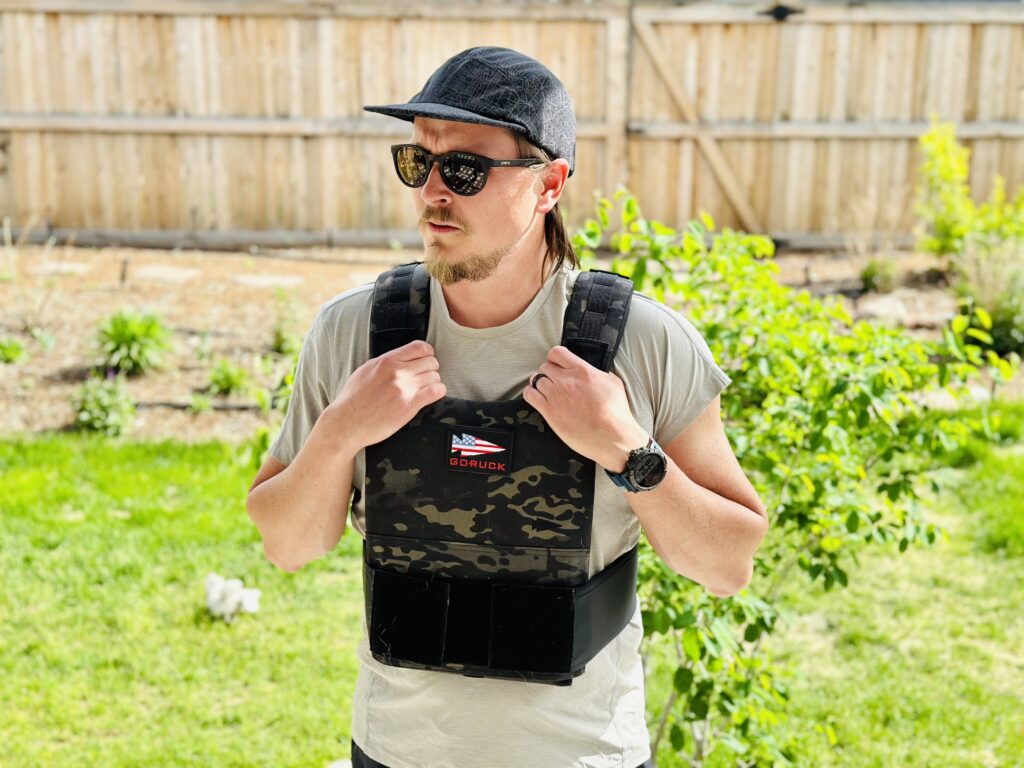
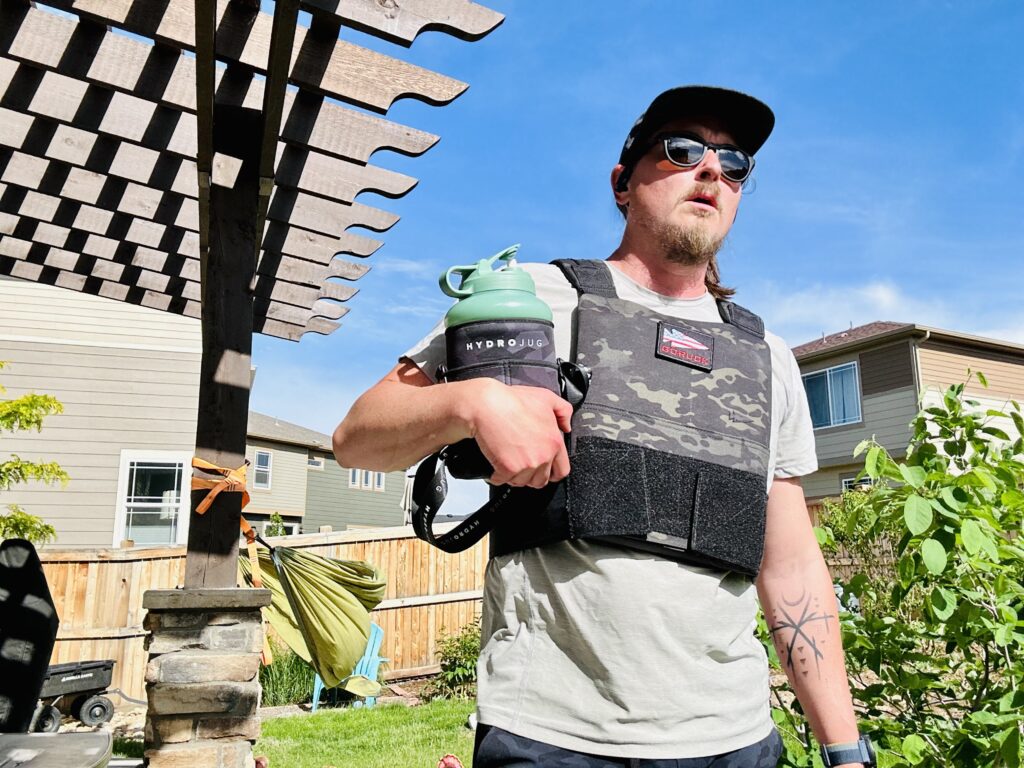
GoRuck Training Weight Vest
Completing the Murph with a weighted vest is a big part of the challenge. Sure, doing the workout without weights is already grueling. But it also simulates the real-life conditions of military personnel and the gear and equipment they carry.
GoRuck Weight Training Vest
The GoRuck Training Weight Vest (full review here) was a consistent companion while I trained and built up my rep counts for the Murph.
Anytime, I walked the dog, I put it on.
When I hiked one of the smaller mountains in Boulder, I put it on.
Running in the GoRuck Training Weight Vest was surprising. I thought it would bounce, but it didn’t. It stayed secure, but didn’t feel tight. I could still breath deeply.
My biggest challenge wearing it was getting used to the weight on my shoulders. For longer periods of activity, my shoulders would tire from holding the weight and I would find myself unstrapping the velcro and stretching; providing some relief. Gradually that feeling went away.
For the Murph, the standard is a 20# weight vest. Mine was 40#. I wore it for both runs, but ended up shedding it halfway through the rows, pushups, and squats.
Ten Thousand Interval Short and Versatile Shirt
Throughout these past several months, Ten Thousand has been a consistent workout partner.
Everything Ten Thousand makes is amazing. The material is soft and moves with you.
When doing workouts, like the Murph, where you are doing a lot of different compound movements, I was very pleased that I didn’t chafe.
I was able to also test how odor-resistant the material was when I took the Interval Short and Versatile Shirt with me on a five-day work trip. Each morning, I went to the hotel gym and I worked up a heavy sweat. By the time I reached by fifth morning and my fifth workout, they still smelled great.
When I am not working out, I find myself wearing them. Even now as I am writing this article, I am wearing them.
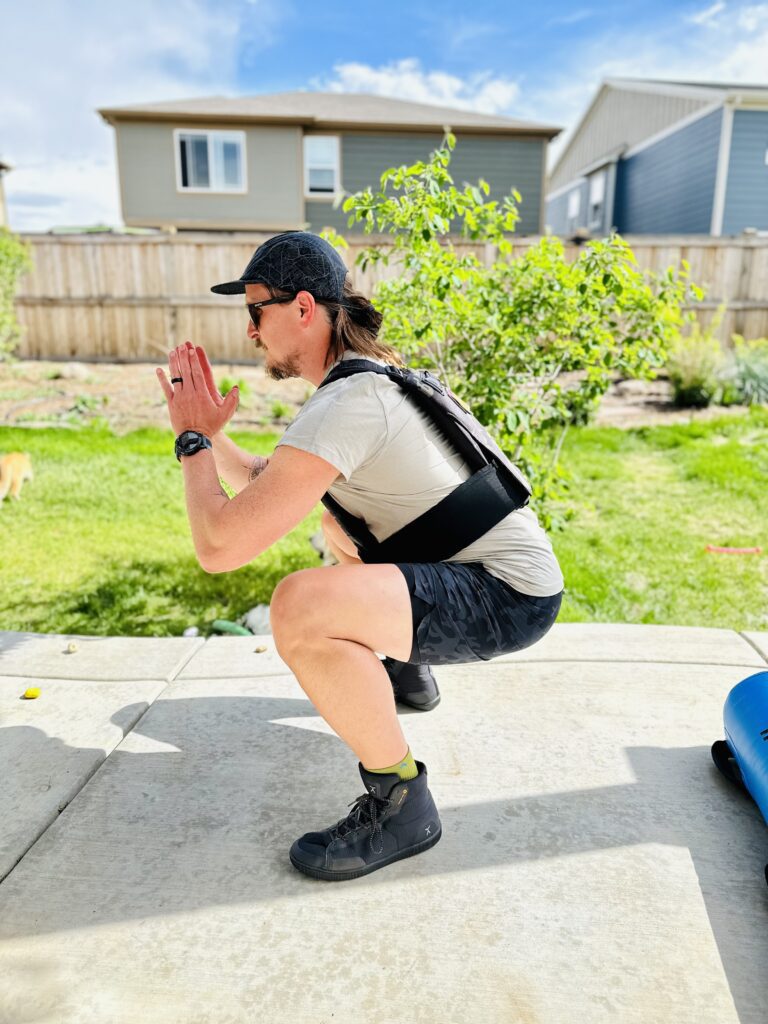
For workouts where I lifted heavy for squats and deadlifts, I consistently found myself wearing the High Top Adapt. I enjoyed the extra ankle stability that the construction of the high top provided. For the Murph, these were my shoe of choice for this exact reason.
One of my favorite features of Flux Footwear’s shoes is their innovative ADAPTSOL CUSHION. It allows the shoe to adapt to the shape of the user’s foot, providing a comfortable and customized fit. The little bumps in the footbed also act as little foot massagers.
These shoes are also minimalist in design. Wide toe box. 10mm insole. 0mm heel to toe drop. It provides the perfect balance between cushion and ground feel so that when I am lifting in them or running, my feet are very happy.
Decathlon Workout Equipment
When I first started this journey, I knew I needed to make some changes with how I worked out. I needed to build up strength, so I could increase my endurance. It wasn’t enough to just do bodyweight pushups or squats with the GoRuck weighted vest.
As I was researching equipment, I realized just how darn expensive it would be to build out my home gym.
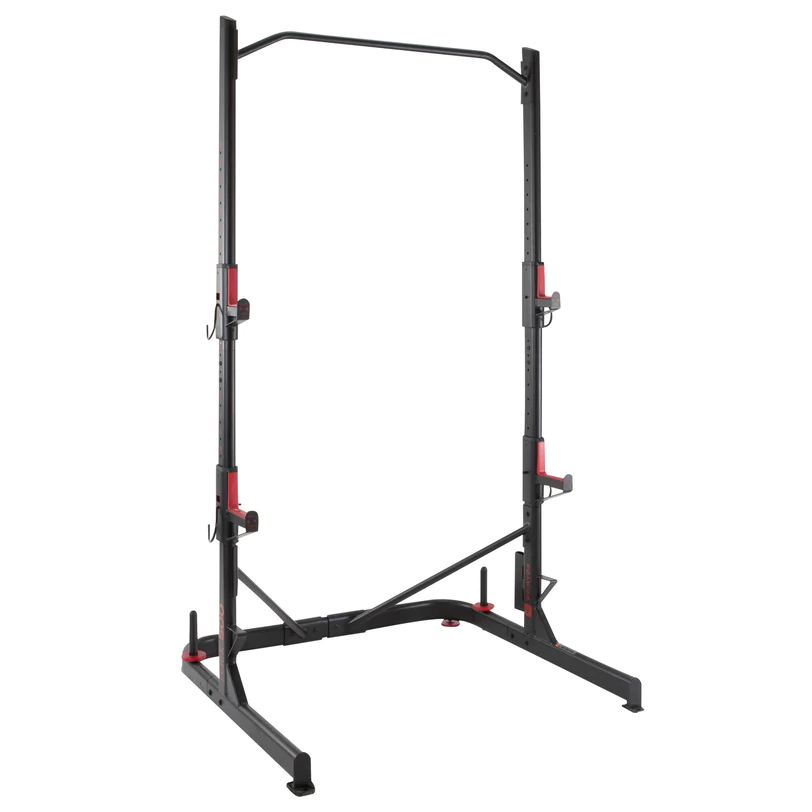
But then I came across Decathlon. Huck Adventures partnered with them to review their weight-training rack and their weight plates. I also purchased a incline weight bench and an Olympic barbell.
What makes Decathlon different is that their business model is built to lower overhead and indirect costs so they can provide their customers with high quality equipment at a lower price than their competition.
When I was researching, I compared prices between Decathlon, the big-box retailers, and leading fitness companies and Decathlon consistently was a better value.
And upon receiving the equipment, I was happy with the overall quality.
Decathlon Weight-Training Rack
The weight-training rack was the most important piece of equipment I added to train for the Murph. Mostly because it allowed me to do pull-ups. It is able to be secured to the floor to prevent any wobbling and if I had the space, I could have trained to do kipping or butterfly pull-ups to have an easier go at it.
The rack was a great setup for bench-press and using as a squat rack to help me build up my strength and endurance for the weighted exercises in the Murph.
I have been very impressed with Decathlon as a brand and the equipment I received and bought from them. If you’re looking to build out your home gym, checkout Decathlon.
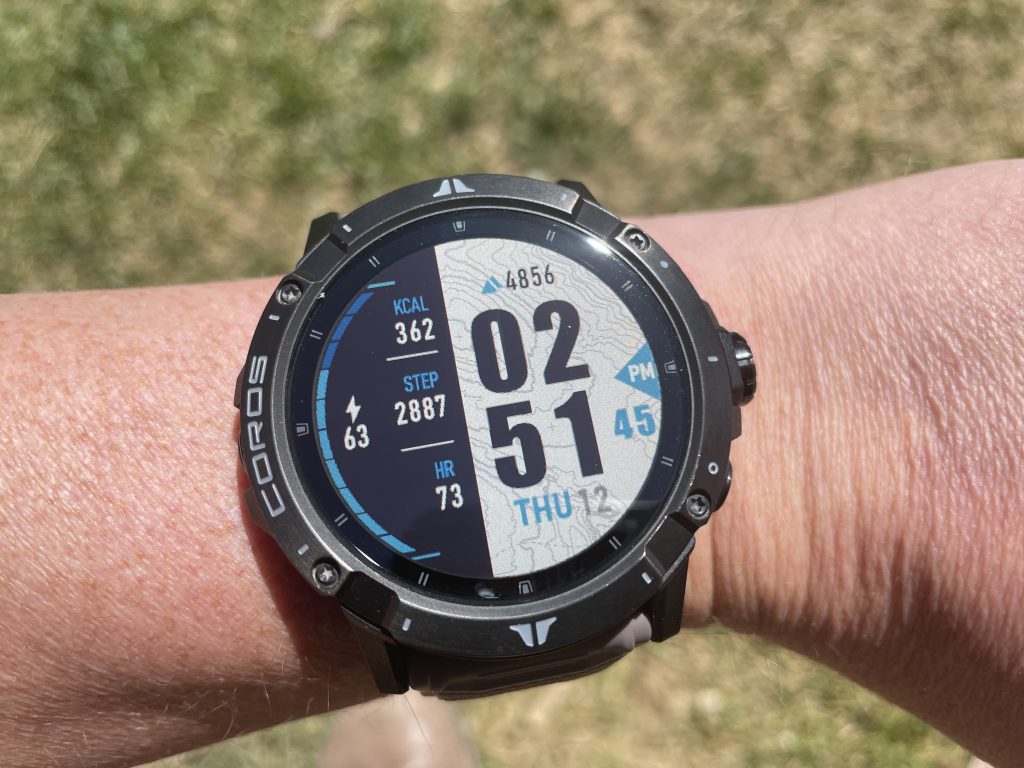
COROS VERTIX 2
The COROS VERTIX 2 was also a consistent partner while I trained.
I mean, it’s a consistent partner every day. I hardly take it off. You can read my full review here.
COROS VERTIX 2
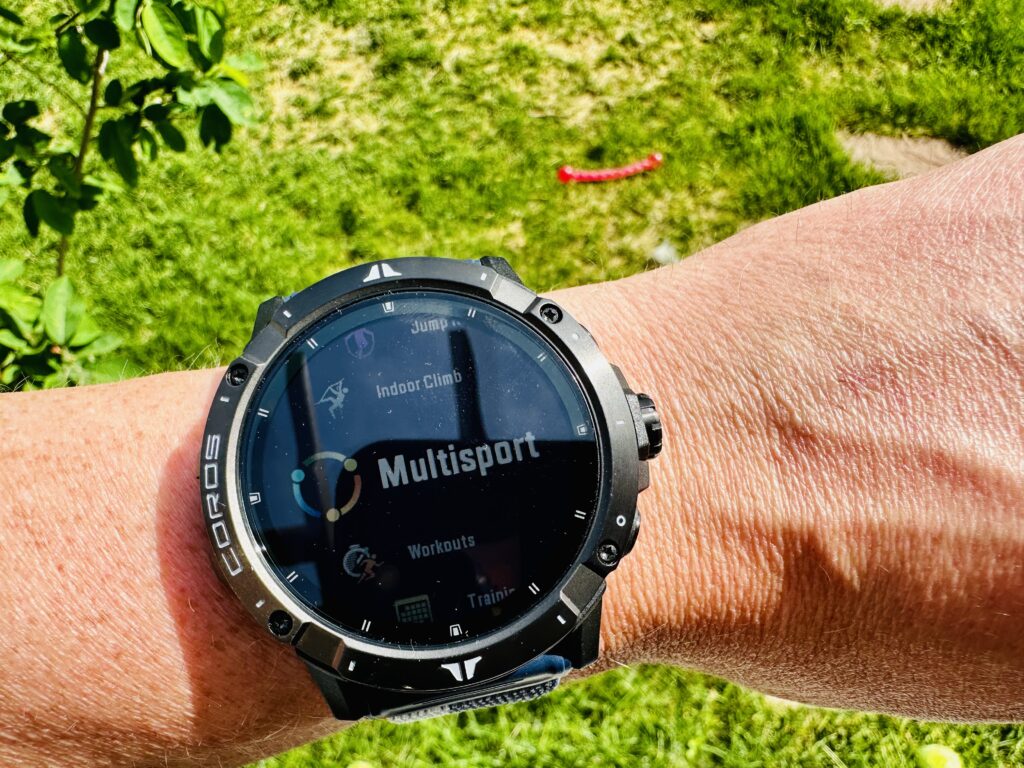
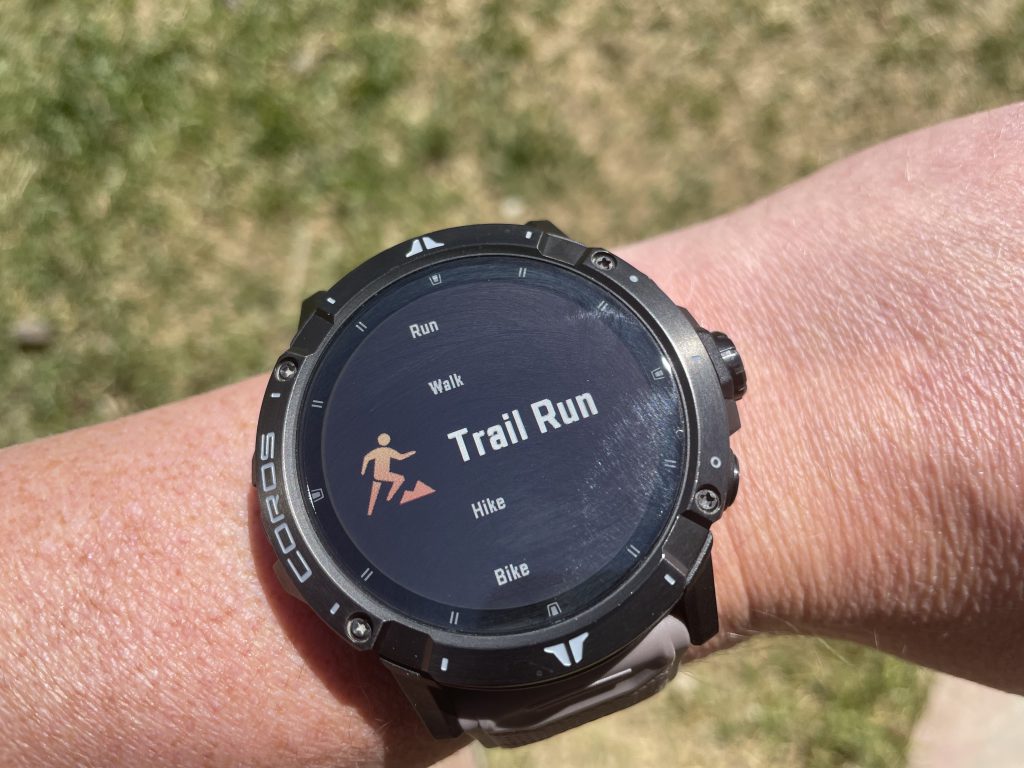
But the big feature I want to highlight is the Multisport mode.
With this mode, you can set up your watch for workouts like the Murph. You can assign 5 different workout modes with the Multisport mode. For the Murph, I set mine up for Run, Gym Cardio (this is the mode I tend to use for a majority of my workouts, focusing more on my heartrate range versus tracking reps and muscle group in their Strength mode), and finally Run.
It is easy to use and setup. The user interface of the watch makes it really easy to switch between workouts in Multisport.
The COROS VERTIX 2 is the best watch on the market, in my opinion. Mostly because of its battery life (on average, I charge every 28 days). But their team consistently brings updates and new features to the watch through their firmware updates. They listen to their customers and continue to improve their software and hardware.
HydroJug
Hydration is one of the most important aspects of pushing yourself physically.
My go-to water bottle for years was a simple stainless steel 32-ounce. But I would find myself filling it up multiple times throughout the day. Which, in itself, isn’t a bad thing, but I’m lazy sometimes.
HydroJug
HydroJug has become my favorite hydration vehicle. It’s a 73 oz. water jug. I tested their plastic version that came with a straw and sleeve to keep your water cool, but they also have a vacuum-sealed stainless steel version, as well.
It’s handle makes it easy to carry and when it’s full, you can get a few reps of bicep curls in.
The flip-top makes it easy to open and the straw has a rubber bottom that allows it to pop out for easy drinking.
Throughout the day, the HydroJug has been a consistent companion. Whether I am working or working out, the HydroJug goes with me wherever I go.
The designs they have on their website are pretty cool, as well. For testing, I received the sage color HydroJug and a black camo sleeve. It looks pretty sweet.
Murph Results
I’m not going to lie.
The Murph Challenge was hard.
I followed GoRuck’s Murph Challenge, which was a one-mile run, 100 bent-over rows, 200 push-ups, 300 squats, and finished with another one-mile run.
I broke out the rows, push-ups, and squats into 20 rounds of 5, 10, and 15 respectively.
For both runs I wore my 40# GoRuck weight vest and wore it for the first 10 rounds of rows, push-ups, and squats.
My total time was 58 minutes. I’m not blaming my kids for my time, but it’s worth mentioning that I had several pint-sized interruptions. Total activity time was 47 minutes.
Halfway through the rows, pull-ups, and squats I had moments where I wondered if I would be able to finish the Murph.
When I started my final run, I knew I was committed, because I had to get home, right? But, being perfectly honest, there were moments where I walked to catch my breath.
But I finished.
A huge thank-you to the brands that partnered with Huck Adventures for the Murph Challenge.
This is going to be a new Memorial Day tradition for me. And I hope to beat my time next year.
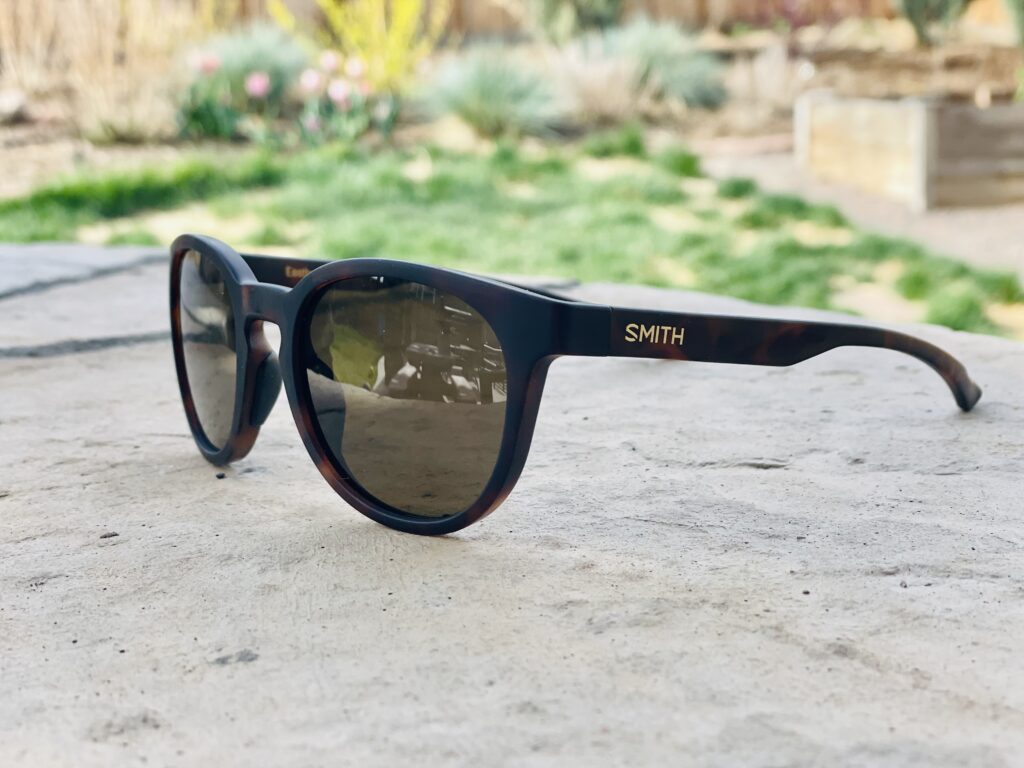
As someone with two prescriptions, one for distance and one for reading, I have always struggled to find the perfect pair of prescription sunglasses that fit my needs. However, with the Smith Eastbank sunglasses, I have found exactly what I was looking for.
Purchasing Prescription Glasses Online
Let’s start with the purchase process.
Ordering prescription glasses from Smith Optics is straightforward and easy.
All you need is your current lens prescription, including your pupillary distance measurement (PD), and you’re good to go.
The first step is to choose your frame and select your lens options. Then, select “Add your prescription,” and enter your prescription details in the Rx Wizard.
If you’re like me, trying to read a lens prescription can be confusing.
On your script, you will have a sphere, a cylinder, and an axis, among a few other details. The sphere indicates the strength of the lens you need, while the cylinder indicates the lens power needed to correct astigmatism. The axis indicates where to place the lens correction for astigmatism.
For multi-focal glasses, such as reading and computer glasses, your Rx will include an ADD or NV value. This number always has a (+) sign. The type of Rx glasses may be noted on a prescription, such as DV [Distance Vision/nearsightedness] and NV [Near Vision/reading].
To measure your pupillary distance (PD), you can visit AccuPD, a free tool that measures your PD.
Alternatively, you can measure your PD yourself following the steps below with a ruler and mirror. Stand 8-12 inches away from a mirror, hold a ruler against your brow or cheekbones, close your right eye and align the ruler end with the center of your left pupil, look straight ahead, close your left eye, and open your right eye. Note the measurement to the center of your right pupil. PD is measured in mm and can be one number like 64 or two numbers like 31/33.
Once you’ve added the glasses to your cart, you can proceed to checkout.
A Lack of Customer Service
My only complaint with this process was that there was no confirmation that the way I interpreted my prescription was correct.
I had a printed copy of my prescription from my optometrist as well as my recent order at Warby Parker to reference.
However, by the time I was done entering in my information, I wasn’t 100% sure I was doing it right. Once my order was complete, I sent an email to Smith Optics support email address with an image of my prescription to make sure I had entered my prescription correctly.
But I never got a response.
Even though I never heard back, when the sunglasses arrived the prescription worked perfectly.
I just wish, for my own peace of mind, that there was the ability to upload a prescription document as part of the purchase process.
When you purchase from Smith Optics, based upon their process and customer service, I would encourage triple checking your prescription before checking out.
Smith Optics Eastbank Review
Smith Optics Eastbank RX
The Smith Eastbank Sunglasses are perfect for anyone who prefers classic looks. The round sunglasses are designed with lightweight, bio-based frames that are both durable and comfortable to wear. The color-boosting ChromaPop™ lenses enhance contrast and natural color, making details pop. Moreover, the lenses provide 100% UV protection, ensuring that your eyes are protected from the sun’s harmful rays.
One of the things I love about these glasses is their fit and integration. They provide medium fit and medium coverage, which makes them suitable for various activities, including gravel biking, trail-running, and hiking.
Smith Optics Eastbank RX
The nose pads provide nonslip grip, which ensures that the glasses stay put even during intense physical activities. The Evolve™ bio-based frame material is lightweight, which means that the glasses are comfortable to wear for extended periods.
Conclusion
The Smith Optics Eastbank Sunglasses are my go-to sunglasses, mostly because they are prescription and I can wear them for longer periods of time without experiencing eye strain.
Smith Optics Eastbank RX
I also love them because how stylish and comfortable they are. I can wear them for hours at a time and not grow tired of them.
When running or bouncing down a steep trail on my bike, them stay on securely without bouncing themselves.
My only complaint was the lack of response from the customer service team. Ultimately, I had entered my prescription correctly, and perhaps it was just imposter syndrome, but not receiving a reply at all was concerning.
Showers Pass Updates Spring Classic Jacket for 25th Anniversary
Jason Nelson | July 2022
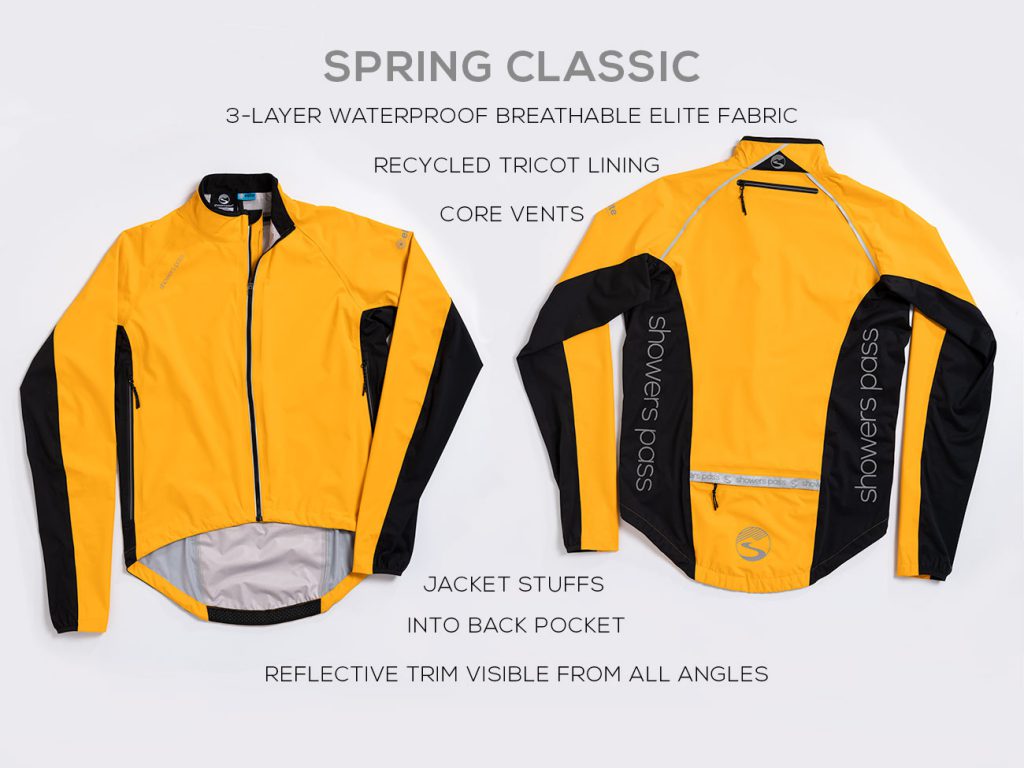
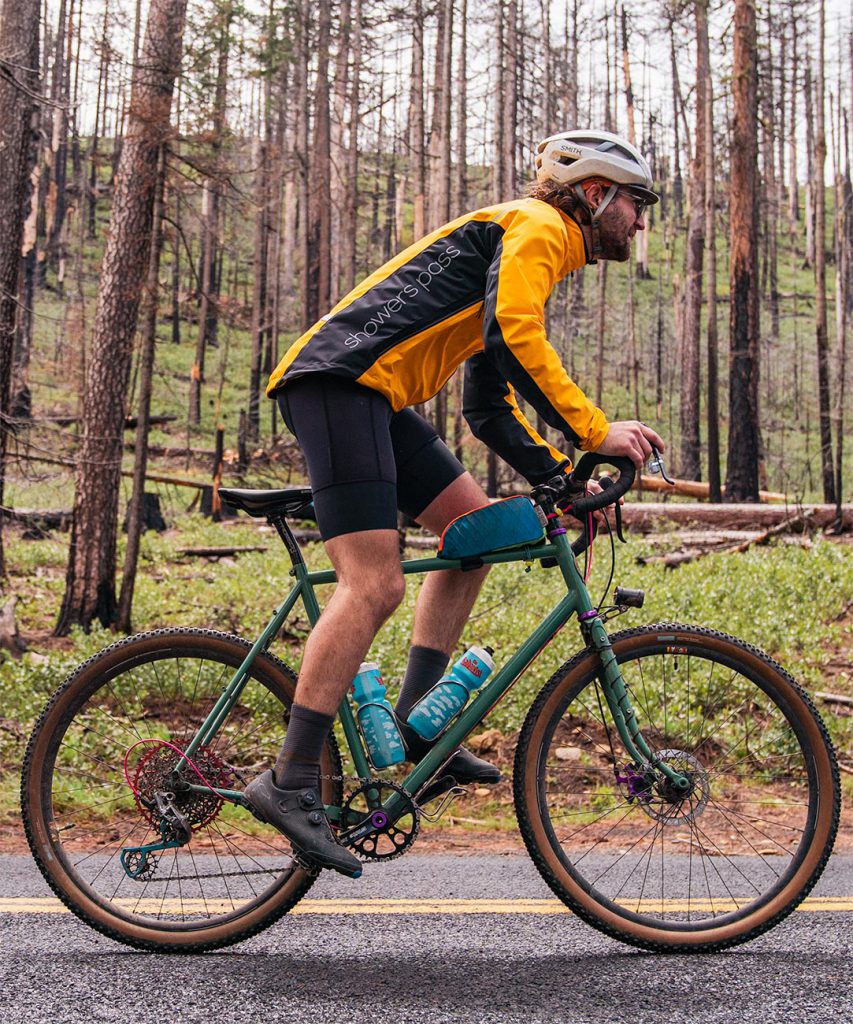
Portland, OR – Showers Pass today introduces an updated version of its Spring Classic jacket, in celebration of the company’s 25th anniversary in the cycling industry. The fan-favorite jacket, also a favorite of pro racing teams, gets an updated look, including a special limited release in the brand’s iconic “Goldenrod” colorway. Performance-oriented updates include Showers Pass’ new eliteAIR™ fabric technology in the underarm construction for optimal breathability.
Showers Pass Spring Classic Jacket
“When competing at a high level in foul weather, regulating the athlete’s body temperature can make or break their performance,” says Kyle Ranson, CEO at Showers Pass. “Be it race day or training day, fully seam-sealed construction is a must for protection from rain and wind; but even in cool weather, the garment has to be designed to maximize the venting of body heat.”
The Spring Classic’s unbelievably lightweight 3-layer construction delivers an impressive 30k waterproof/20k breathability rating. It also features a trim fit, angled full-zip front, dual core vents, and upper back “exhaust vent” for added airflow and to prevent billowing. Reflective accents throughout improve visibility while on the road, and a back pocket holds essentials or stows the jacket when not in use.
Showers Pass was born in 1997, from the desire to develop clothing and gear that would get people out on their bikes no matter the weather. The brand’s reputation is built on the use of high-performance materials in combination with innovative functional design. Originally specializing in waterproof-breathable outerwear, Showers Pass now offers industry-leading Merino baselayers, active apparel, waterproof accessories, and waterproof bags. The Portland, Oregon based company is made up of a team of outdoor enthusiasts who bike, run, ski, hike, climb and play in the outdoors.
When COROS debuted several years ago, it was a disrupter in the field of GPS watch categories. It’s impressive out-of-the-box features and battery life threatened to push Garmin and Suunto off their pedestals.
Three years ago, when I was researching the best GPS running watch I stumbled upon COROS on Instagram and decided to purchase their Apex watch.
This was after using the Apple Watch for a majority of my training. My biggest frustration with the Apple Watch was that I would have to charge it every night and for longer GPS excursions, it would die halfway through.
What made COROS stand out more than anything else was their battery life. And the Apex delivered. Even on heavy training weeks for ultramarathons, I could still go 15 days before I needed to recharge it.
And while it lacked some features that I missed with the Apple Watch (like being able to track non-GPS workouts), COROS’ team of developers started to deliver on those features with firmware updates.
COROS VERTIX 2
The new VERTIX 2 landed last summer with a ton of new features, including music playback, dual GNSS functionality, full-color topographic mapping, ECG functionality, WIFI connectivity for updates, amazing battery life, and Insta360action cam controls. Externally it boasts a larger screen and titanium alloy bezels and case to survive any adventure.
I’ve been using the watch all day, every day for the past three months. It has been with me on trail runs, bike rides, ice climbs, gym rock climbing, road runs, backcountry skiing, indoor cardio workouts and indoor bike rides.
So, let’s dive in on why this watch is the best gps watch on the market.
VERTIX 2 Overview
The VERTIX 2 is a massive watch. I have skinny wrists and was a bit uncertain wearing this monstrosity 24/7 over the course of our testing period. And it did take some getting used to: both size and weight. But after the first week, it was as comfortable as the APEX.
On the right side of the watch (if you’re wearing it on your left wrist) there are two buttons and a separate digital crown (which rotates and can be pressed in).
The top button is used to turn the backlight on or off.
The bottom button has a number of functionalities. On the main screen, outside of a tracked activity, it can be tapped to cycle through metrics on the home screen or held to jump to the settings folder.
COROS VERTIX 2
With the digital crown, if you press and hold, it will unlock the screen. This is much better than the unlocking function on the APEX. With the APEX, I had to turn the dial to unlock which was especially frustrating when in the middle of an activity, especially in the wintertime when I was wearing gloves.
With the VERTIX 2, I found the crown easy to use, even when wearing gloves. When I was skiing in the backcountry, it was easy to shift between uphill and downhill tracking, as well as pausing for a snack break.
While in the middle of an activity, the digital crown can be used to cycle through your activity metrics. This is great for some activities (like indoor cycling or GPS cardio) when I am focused on duration and heart rate (trying to keep it in the fat burning zone).
While the touchscreen isn’t a new feature for COROS or GPS watches in general, it is still worth highlighting. It is primarily used outside of workout mode. You can click into widgets to slide through your metrics. Or pull up a map and move around easily.
I haven’t found myself using the touchscreen too much outside of the widgets. It is a much easier tool that the dial to cycle through and look at a particular time frame of data.
The watch bands connect using a quick release system. Again, this is a step up from the APEX. The tabs to pull and release are much easier to use, allowing you to swap out bands or remove them all together to connect to the COROS Carabiner so you can climb without the watch attached to your wrist.
On the back of the watch is the charging port and optical heart rate sensor. The heart rate sensor is the set of LED’s and optical sensors (bright and vibrant red and green lights) that measure your heart rate, but also blood oxygen levels and ECG data.
ECG / HRV Feature
To access the ECG feature, navigate to the settings menu and click HRV test. It’ll ask you to place your hand on the bezel.
And it’ll start the ECG, lasting for 60 seconds. Throughout you’ll feel a vibration, similar to a heartbeat. At the end you’re given a HRV value, not an ECG value. Which is confusing.
I’m unsure if this is a feature that will continue being developed.
The HRV value does show up in the app and you can watch the trend over time. The value is scaled from 0-100.
81-100: Superior, relaxed
51-80: High, under minor physical or mental pressure
21-50: Medium, under medium physical or mental pressure
1-20: Low, under significant physical or mental pressure
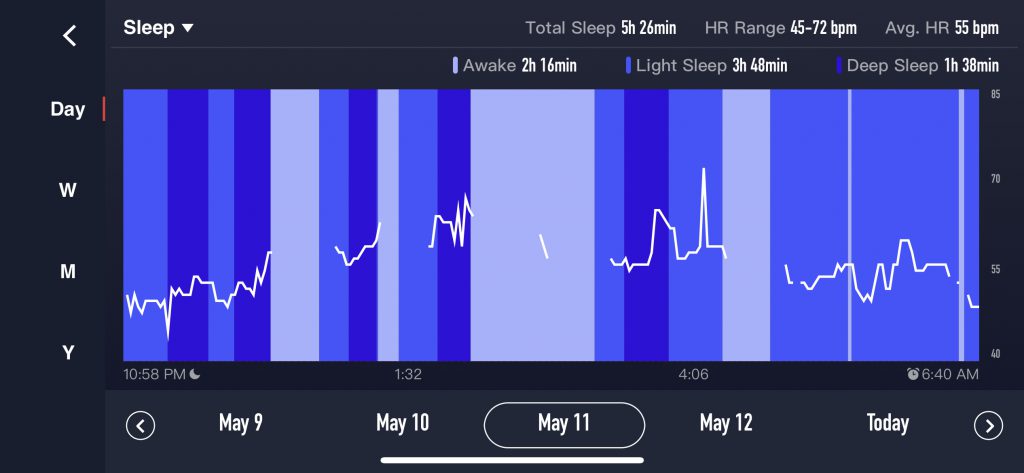
Widgets for Days
When you’re on the home screen, you can move into the widget menu by unlocking the screen and moving the dial.
Widgets include everything from steps, KCAL burned, workout duration, recovery data, to sleep.
With each widget, you can click into with the dial and scroll through the data with the dial or your finger on the screen.
I have found that most of these widgets are pretty accurate. With the exception of sleep. I think it’s because of the size of the watch, but I have found that if the watch isn’t centered on my wrist that I will miss out on sleep data; viewable as large gaps of “awake” time during the night. Additionally, if I get up in the middle of the night for a bathroom break or to help an awake child, it will register that as the moment I awoke—not counting when I went back to sleep a few minutes later.
I slept like a rock, but COROS is registering a lot of awake time. More than likely because of the way the watch was positioned.
Notifications and Settings
One of the reasons I hated using the Apple Watch as a primary fitness watch was all the notifications I would get. Anything my iPhone received, so did my watch. Ping, ping, ping, ping, ping.
With Coros, I have the ability to be in the same predicament. But I am very conscious about the impact all those notifications have on my mental health, so I have a majority turned off. Right now, phone calls is the only notification I receive. Anything else can wait till I’m at my phone.
But it is fully customizable when you first setup the watch on the COROS app.
If you hold the bottom button, you can also access the settings menu. Here you can access the above mentioned ECG function. But you’re also able to connect to Bluetooth devices, WIFI, Insta360 action cam control, alarms, the compass, and music.
Music and Insta360 Cam Controls
The VERTIX 2 is COROS’s first watch to feature music. Bluetooth headphones are paired through the headphones menu in Settings. You can pair multiple Bluetooth headphones, which is a great feature for ultramarathons when you might burn through a pair or two.
Pairing is easy and once setup, they are easily accessible. When powered on, the watch will connect to them. When tested, it would take over the connection from my iPhone easily.
For music, the VERTIX 2 supports loading MP3 files to the device using a USB cable from your computer. Drag and drop the files you want to the “music folder” and you’re ready to start jamming by selecting the music menu from the settings menu.
You can use the touchscreen to play, pause, skip tracks, etc.
It should be noted though that you can only load MP3 tracks. Services like Spotify or Apple Music isn’t compatible and probably won’t ever be.
Now, at the time of testing, we couldn’t test the Insta360 controls. But to give an overview, if you have the Insta360 Go 2, One X2 and One R), you can control the camera with the VERTIX 2.
Using the dial, you can alternate between photo and video mode, then press the dial to take a photo or start recording a video.
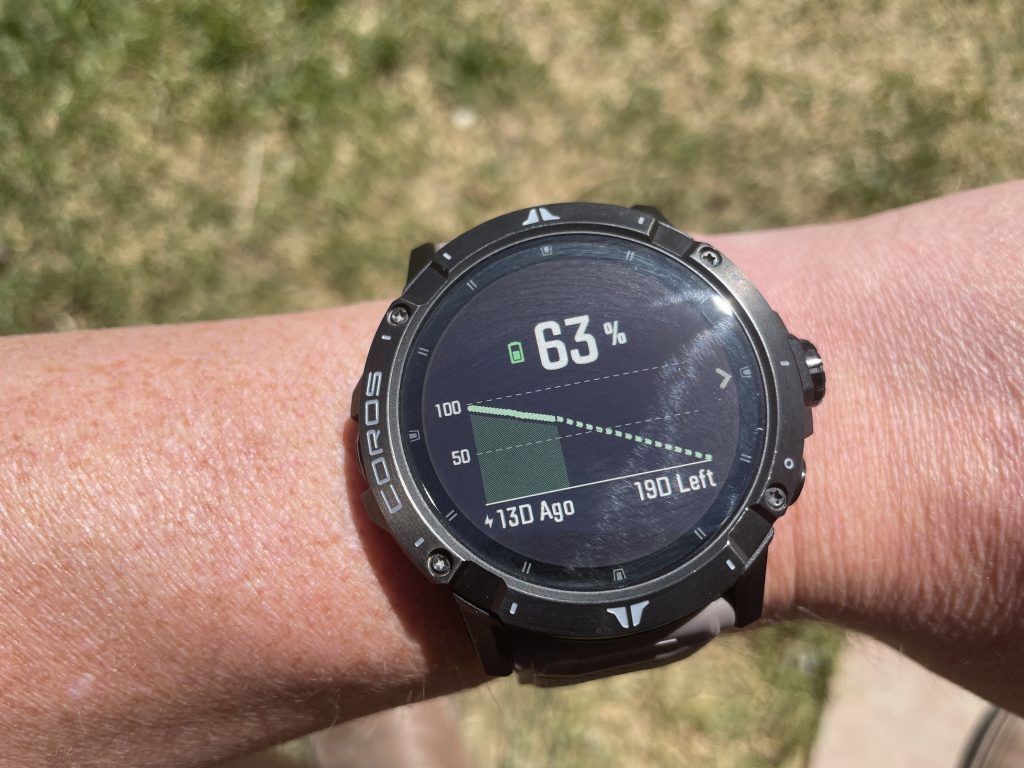
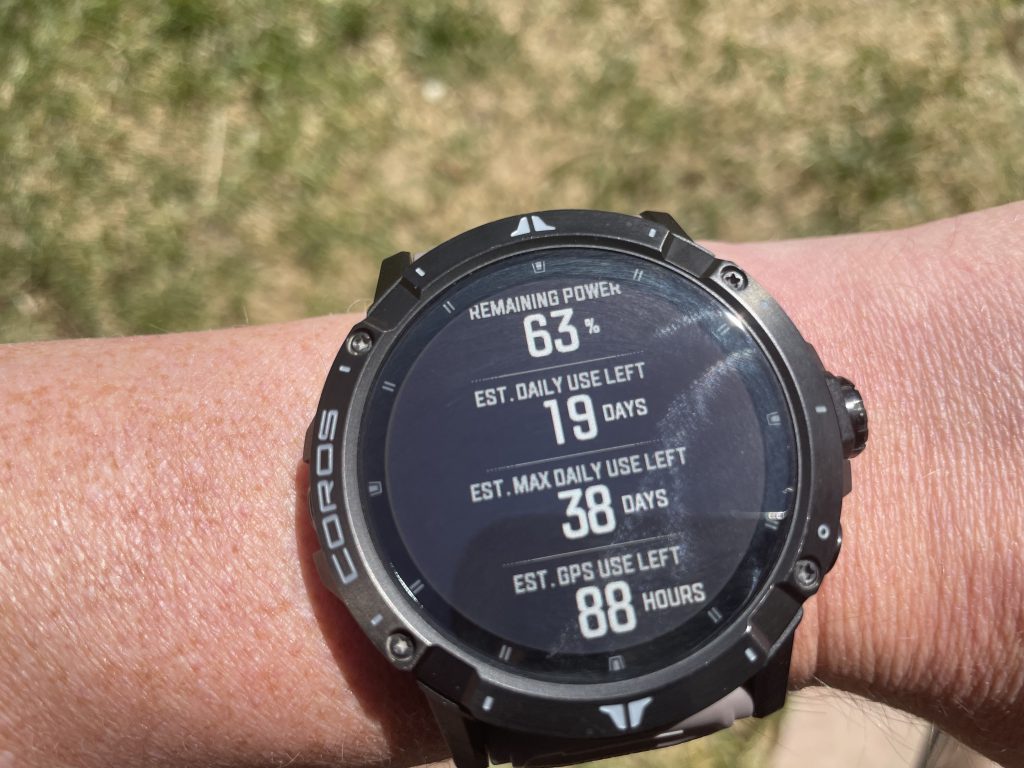
Battery Life
COROS VERTIX 2
The VERTIX 2 lasts up to 140 hours of standard full GPS tracking and 60 days of normal use. With light GPS usage, daily workouts tracked, and with wearing the watch 24/7, I have gone 35-40 days between charges. During heavy usage periods, using GPS daily, I have gone 25 days between charges.
COROS VERTIX 2
Some features, like the ECG/HRV test, music, and Insta360 camera control will drain your battery faster.
It should be noted that the VERTIX 2 uses a proprietary charger, so don’t lose it!
GPS Activity Tracking and Maps
During our testing period we took the VERTIX 2 everywhere: hiking, trail running, road running, road biking, trail biking, back country skiing, ice climbing, and most recently, paddle boarding (yay! spring has sprung!).
GPS accuracy can make or break a watch.
One of the biggest challenges I had with the APEX was that when I was doing trail races with a lot of vertical gains, the watch would think that I wasn’t moving and stop tracking.
COROS VERTIX 2
The VERTIX 2 has improved on this by offering Dual Frequency GNSS. This allows the watch to locate the best GPS frequency available from all five of the major satellite systems at the same time.
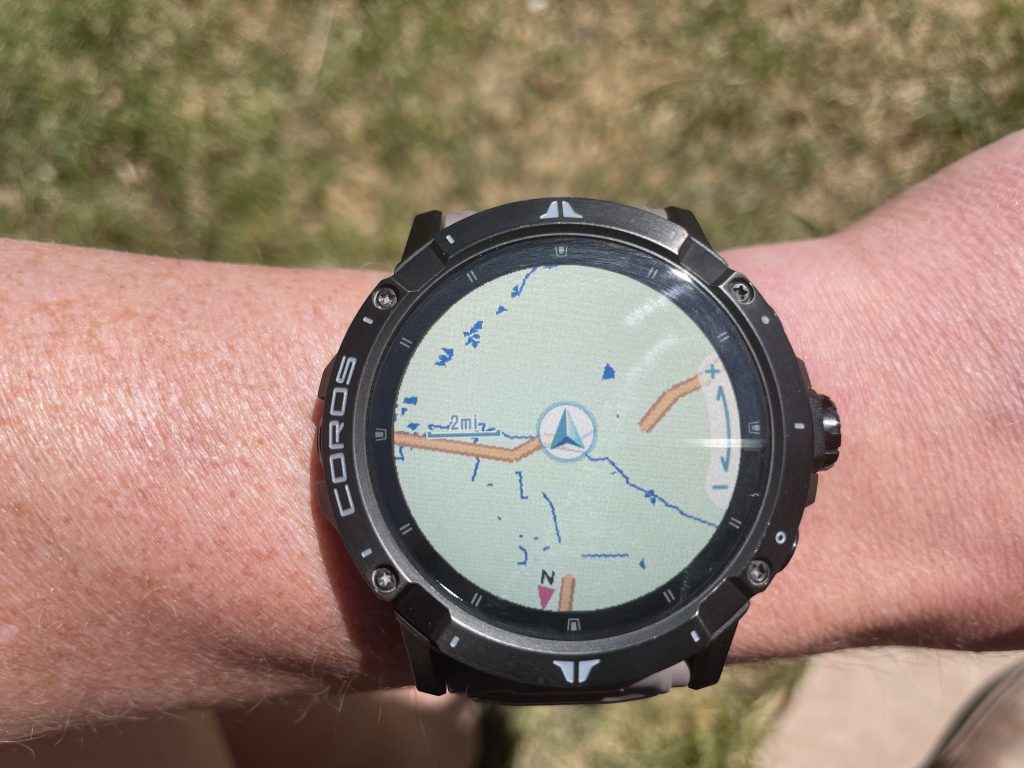
Additionally, navigation features include topographic, landscape, and hybrid global mapping. You can load a route by transferring it to the COROS app and loading it directly to the watch from the app. I used this feature in the backcountry and part of the challenge is that on the map there aren’t any labels or turn-by-turn directions. So it was challenging navigating back when I got off course and lost the trail.
COROS VERTIX 2
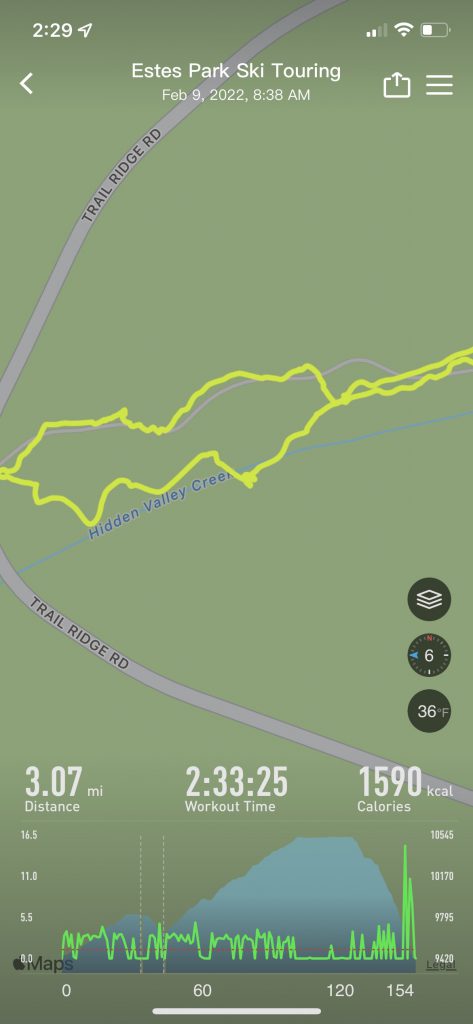
When I looked at the routes tracked, I did find the VERTIX 2 to be pretty darn accurate, including in heavily wooded areas or terrain that had more vertical climbs.
I highlighted a few examples to showcase the accuracy of the GPS data.
In the middle image, this was a point on my run where I transitioned from trail to sidewalk. While it didn’t show me directly on the trail, throughout it caught every little turn and pivot I made, including where I ventured off the paved trail onto a single track.
For the Ski Touring tracking, when I zoom in, you can see all the switch backs I went up.
What I am most impressed by is the fact that the watch is more accurately picking up trail runs on steep inclines. No longer is the watch auto-pausing because it can’t register movement. And that in itself is a huge winner for me as I continue training for ultras this Summer.
Conclusion
Throughout the testing period of the VERTIX 2, I continue to be impressed by the leap forward COROS has taken with this watch.
There are a ton of really awesome features with the music and Insta360 features.
But more than anything, the feature that is worth shouting about is battery life. There isn’t another watch on the market that can match COROS on what they were able to accomplish with the VERTIX 2.
Sure there are some improvements I’d love to see (especially with maps), but if there’s a company I trust to get it done, it’s COROS. Their developer team is amazing and based on what they have done in the last few years, I’m fairly certain they will keep the VERTIX 2 ahead of the competition
If you’re an endurance athlete or avid explorer, I have no doubt that this is the watch for you.
The COROS VERTIX 2 is available online and at several different retailers. It retails for $699.
One of the challenges with backpacking in cooler / cold weather is the back sweat.
I’ve rarely had a hike where I’ve been in at a comfortable temperature for the duration of the hike.
And it’s always on my back. I’m either feeling too hot in that spot where my back connects to my pack or I’m cooling down and you get a nice chill in that same spot.
Or I’m shedding layers. Stopping on the trail, taking my pack off, taking my jacket off, stuffing it in my pack, putting my pack on, and then feeling freezing a few minutes later and reversing that process.
It’s a horrible cycle to be stuck in, which is why I have avoided winter backpacking.
Until now.
Pak-Jak: The Best Backpacking Jacket
Pak-Jak took on this exact case study to create the best backpacking jacket.
The Swappable Back Jacket
Their jacket is designed for ultimate flexibility on the trail with an interchangeable and flexible back.
Puffy jacket back
Mesh jacket back
Or no jacket back with connectable straps to secure your pack.
With this flexibility, it is entirely possible to start your hike with the puffy jacket back and swap out the back when you feel too warm. And I think that’s a great option for long, all-day or multi-day hikes.
When I tested this feature, it took around 90 seconds to swap out the back for the mesh back and just over three minutes to fully remove the back and connect the straps to the jacket and the pack.
Which isn’t bad. When I swapped backs, I didn’t go back to the full jacket. Because I swapped before my base layers were sweaty, I was able to manage my temperature. Plus, my backpack provided enough coverage from the cold on my back.
Options, Options, Options
I don’t call the Pak-Jak the best backpacking jacket easily.
But this jacket earns that title because of it’s flexibility.
I can’t tell you how often I am planning a day trip and I am standing there, staring at my gear closet, trying to decide what to take with me.
Part of that is because I am trying to account for all scenarios.
When you’re above tree level, weather can change very quickly, and I want to be as safe as possible.
But I also want to be comfortable.
On top of the ability to change out jacket backs, the Pak-Jak also had a detachable hood.
The hood itself adds 2.1 oz. to the total weight of the jacket.
With the full back, the jacket weighs in at 15.7 oz; the mesh back is 16.4 oz; and without any back is 11.8 oz.
Now, while there are three options, I do suggest trying out the mesh back versus the no back prior. That way for your hike, you’re only carrying one option to swap out to instead of two.
Features
The Pak-Jak features Primaloft Gold Insulation; one of the best highest performing synthetic insulations.
It has a great warmth-to-weight ratio, which is why the Pak-Jak is so light.
During one of my test hikes, it was snowing. And even with a heavy, wet snow, I found that the jacket had great water-repellency and wet protection.
The jacket also has a no-chafe guard at the top of the zipper near the neck. During my cold weather hikes I really appreciated this feature because I could keep the jacket zipped tight and not feel like my chin was going raw.
For the puffy back and the mesh back, they are connected with zippers. There are guards on the bottom that fold over the zipper so that your backpack doesn’t accidentally loosen the connection.
Pak-Jak Back Strap
If you swap to the no back option, the straps that are included synch the back of the jacket so that it isn’t blowing free. But the jacket also comes with universal shoulder straps to help keep your backpack connected to the jacket and minimize bounce.
Conclusion
I think the Pak-Jak is the best backpacking jacket on the market.
It’s a new company and I think this product is going to shake up this category.
The product designers were very intentional with everything they put into this jacket.
I should note that this jacket does come in Men and Women sizes. I test a Large and I’m 5’11” and 185 pounds.
When I stopped at the Tasc Performance booth at Outdoor Retailer, I knew I had stumbled onto a pretty special and unique brand.
Tasc Performance clothes are made from a bamboo fiber blend, which is great for any type of activity due to its moisture-wicking, anti-odor, and wrinkle-resistant properties.
At Outdoor Retailer, it was immediately noticeable how lightweight and comfortable their clothing was. The bamboo fiber blend made it extremely soft and I knew I had to try them out on the trail.
Field Testing
Tasc sent me a handful of products to review. In this post, we’ll break down two products: the Carrolton Tee and the Recess Short.
The Recess Short
Tasc Performance Recess Short
With the Tasc Performance Recess Short, the softness of the bamboo fiber blend was immediately apparent. It might TMI, but I have been have some chafing issues in the nether region. During the field test I took them out on a mountain hike and several runs and I never experienced any redness or soreness down there. I also through in a handful of home workouts and yoga sessions.
When comparing them to my other go-to running shorts, they also weighed in 2 grams lighter.
The shorts have several pockets for storage. I was able to easily hold a few gels and a flexible water bottle in the side pockets, and my keys in a zippered side pocket. On the bamboo liner, it has a cell phone pocket that easily held my iPhone 12 Pro.
The pockets kept things secure enough so that there wasn’t too much bouncing, but ideally on longer runs, I would store a majority of those things in my running pack.
Not getting chafed by itself made these shorts a winner. But I’ve also just lounged around the house in them. The liner isn’t too tight or constrictive. It kept everything in it’s place while giving me room to stretch out.
I also found that they are suitable to nearly every workout activity I could think of. While doing jump squats or downward-facing dog, I never felt that the shorts were slipping in a way that would expose my butt crack. But I also didn’t find myself constantly adjusting the liner.
The Carrolton Tee
Tasc Performance Carrolton Tee
To say that the Tasc Performance Carrolton Tee is as smooth and as soft as butter may sound like an exaggeration, but it’s not. I wish all my shirts were this soft.
While on my mountain hike, I had my go-to running back slung over it, and what I noticed was that I really liked the collar.
The collar sits a bit higher than my other running shirts. And what’s great about it is that I didn’t experience the normal chaffing I would get around my neck from my running pack. It’s the little things that make a difference.
The bamboo fiber also lays a bit different than a normal running shirt. It is heavier and because of that, I didn’t experience the typical riding-up I normally would have during yoga or HITT workouts.
The Bottom Line
Truth be told: I’m a big fan of Tasc Performance.
Not only were they really comfortable during my activities, but I put them through the ringer to test out the other bamboo proprieties: moisture-wicking and anti-odor.
I spent around 15 hours of heavy activity in them and they passed the smell test. I mean, it was a little funky towards the end, but it didn’t have the normal funk of my workout and running clothes.
If you’re looking to upgrade your running apparel or needing something that you just want to be comfortable in, look no further than Tasc Performance.
The Best Lanterns for Camping: BioLite’s AlpenGlow
Jason Nelson | September 2021
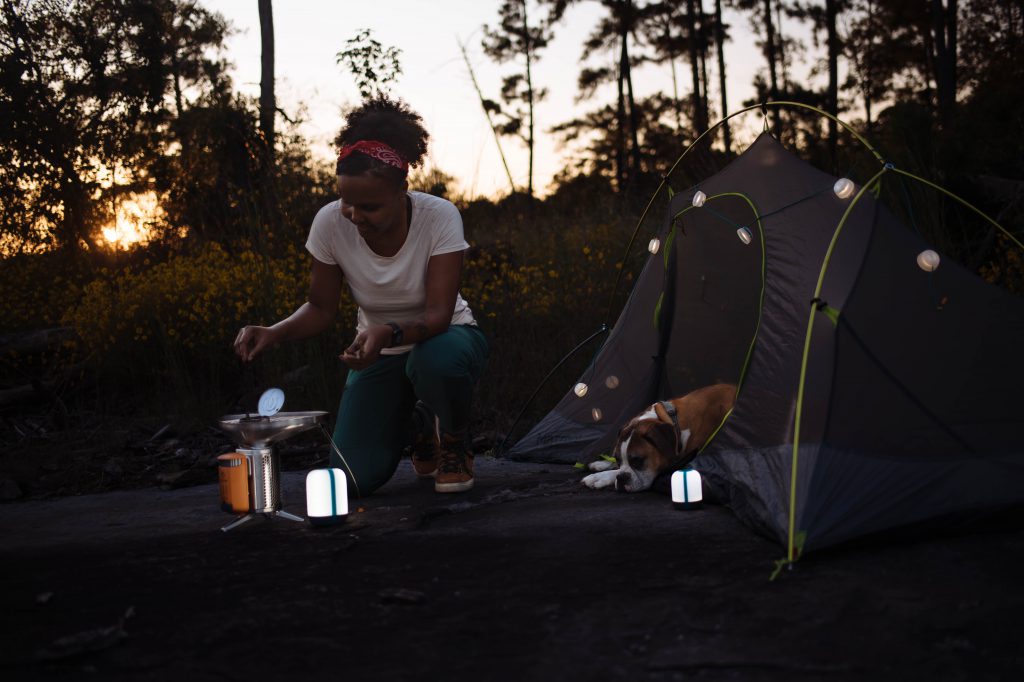
One of the standouts from this year’s media event at Outdoor Retailer was BioLite’s innovation in the camp lantern market. They debuted their AlpenGlow Series, featuring USB-rechargeable lanterns, and I was excited to have received them to test out in the field.
BioLite AlpenGlow Lantern
The AlpenGlow models offer 250 and 500 lumens. It utilizes ChromaTeal LED Technology, providing surprisingly accurate color rendering in lowlight conditions. But the coolest feature is the built in accelerometer that will activate “Candle Flicker” mode or “Fireworks” mode.
I brought these lanterns with me to a recent Cub Scout camp and the Fireworks were a hit; the colors quickly cycling between red, blue, purple, green, and orange.
BioLite AlpenGlow Lantern
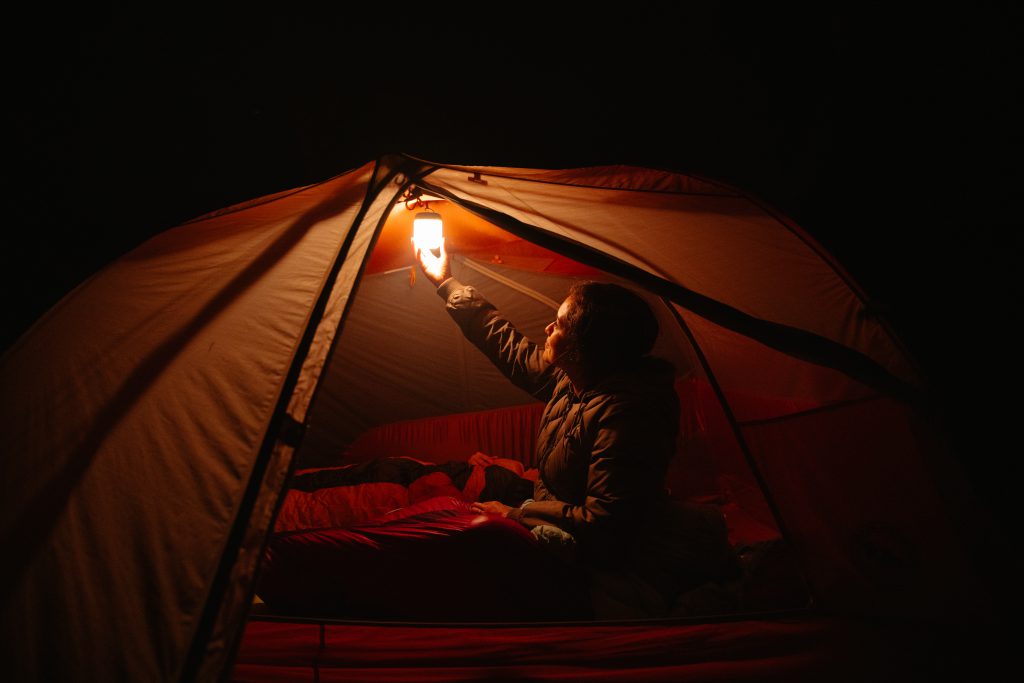
As for the functionality inside the tent, it provided adequate lighting (especially with the 500 lumen model) to go about setting up our bedding, changing clothes, or doing some light reading.
BioLite AlpenGlow Lantern
The bottom of the BioLite AlpenGlow has a hook that can easily hang from the ceiling. And it also has a USB outlet that allows you to plug your phone in to charge or attach a series of SiteLight String Lighting for additional illumination.
Once my son was asleep, I was able to sneak out of the tent with one of the lanterns and sit at a nearby picnic table with some of the other parents to converse. The lighting modes were easy to navigate back to a warm light that wasn’t so bright it would disrupt our sleeping children.
The next morning, while it was still dark, I navigated the campsite (lantern swinging next to my side) to start preparing breakfast. As the sun was coming up, it provided able illumination so I could make sure the pancake batter wasn’t too think and the bacon wasn’t getting burnt.
BioLite AlpenGlow Lantern
I was really impressed by these lanterns and the technology they are infused with. I’ve been a fan of BioLite for years and these lanterns didn’t disappoint.
As the days get longer and colder, I look forward to sitting out on my porch with these for illumination.
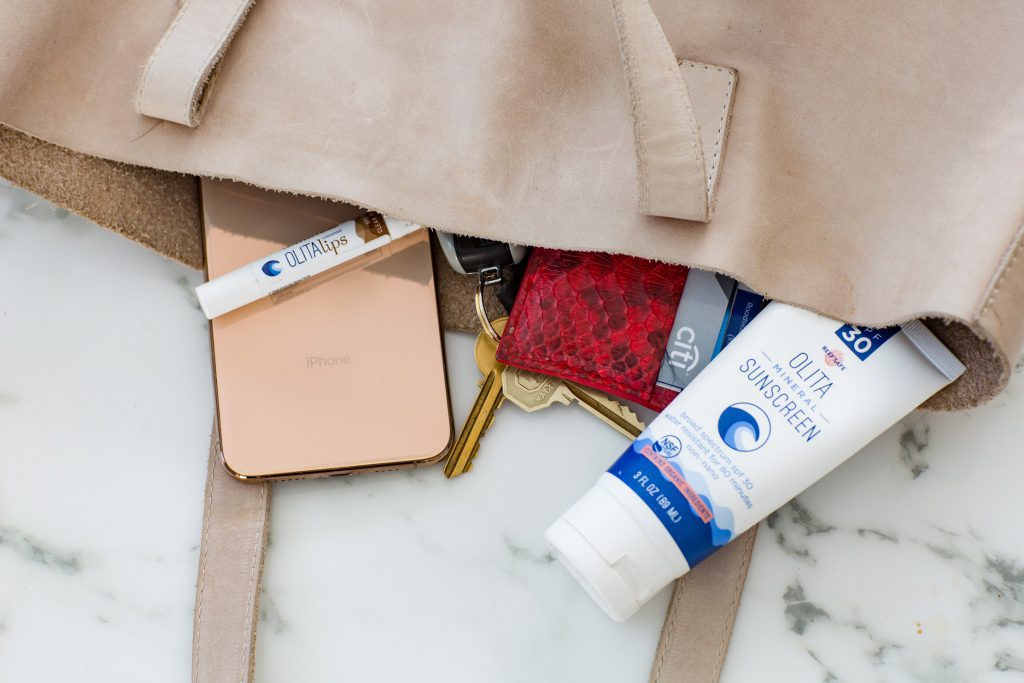
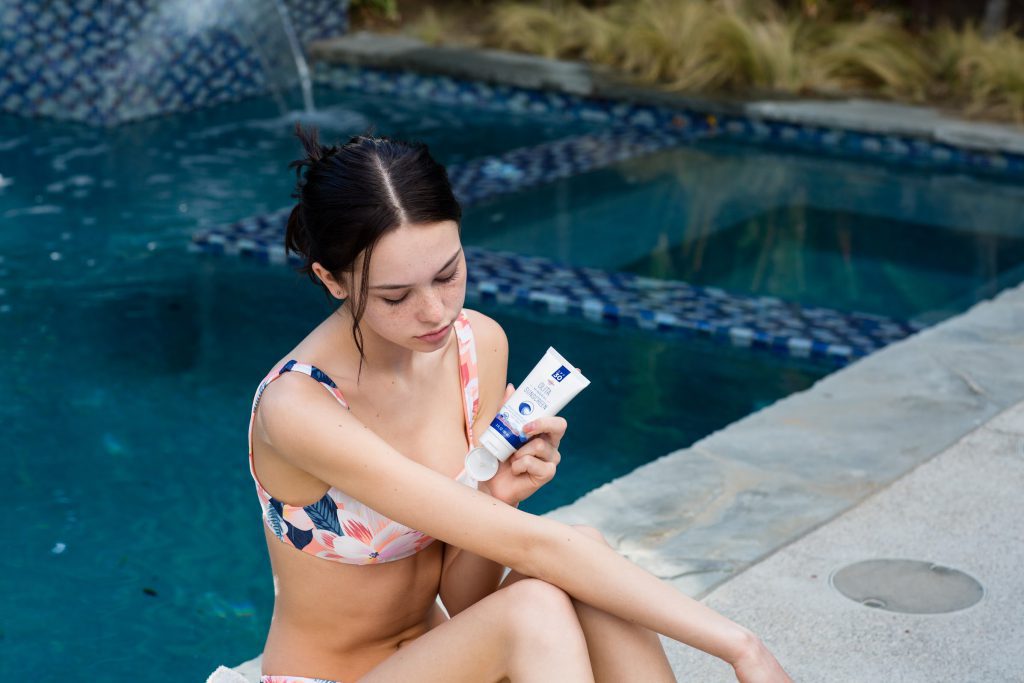
Having a solid sunscreen for your outdoor adventures is key.
When I look for the best sunscreen, it’s looking for one that will provide amble sun protection, but will also stay on in the water, but also won’t run into my eyes when I sweat.
That’s why I was excited to get a free sample of OLITA’s SPF 30. It checks all those boxes. Plus it is super gentle on the skin when applied; easily rubbing and blending in.
OLITA’s SPF 30 is an organic mineral sunscreen that is made from non-toxic, fragrance-free, water-resistant, and reef-safe ingredients for up to 80 minutes.
I’ve tried other sunscreens in the past that were natural, organic, and reef-safe, but I always ran into challenges with them rubbing in and running into my eyes. And my skin is very important to me. Now that I am in Colorado and spending more time outdoors, exposure is high and I don’t want to look 60 when I turn 40. And I’ll avoid rubbing a sunscreen on my face if I know it’ll run into my eyes. There’s nothing like your eyes stinging when you’re trying to crush a 50K.
But I have been very happy with this product, as well as OLITA’s mission to help the environment through their product development.
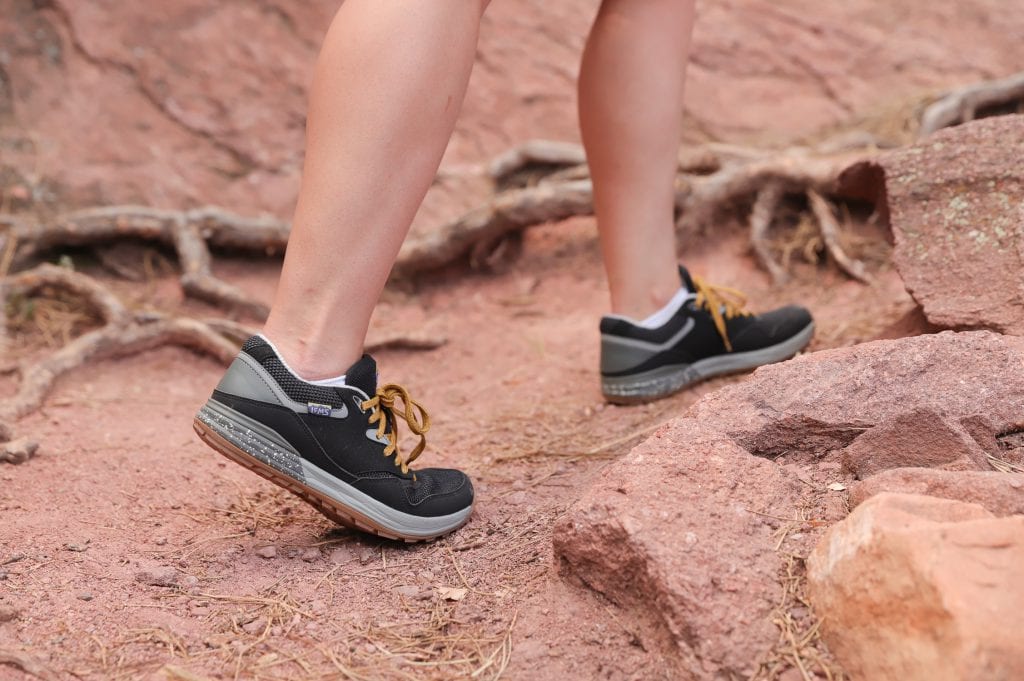
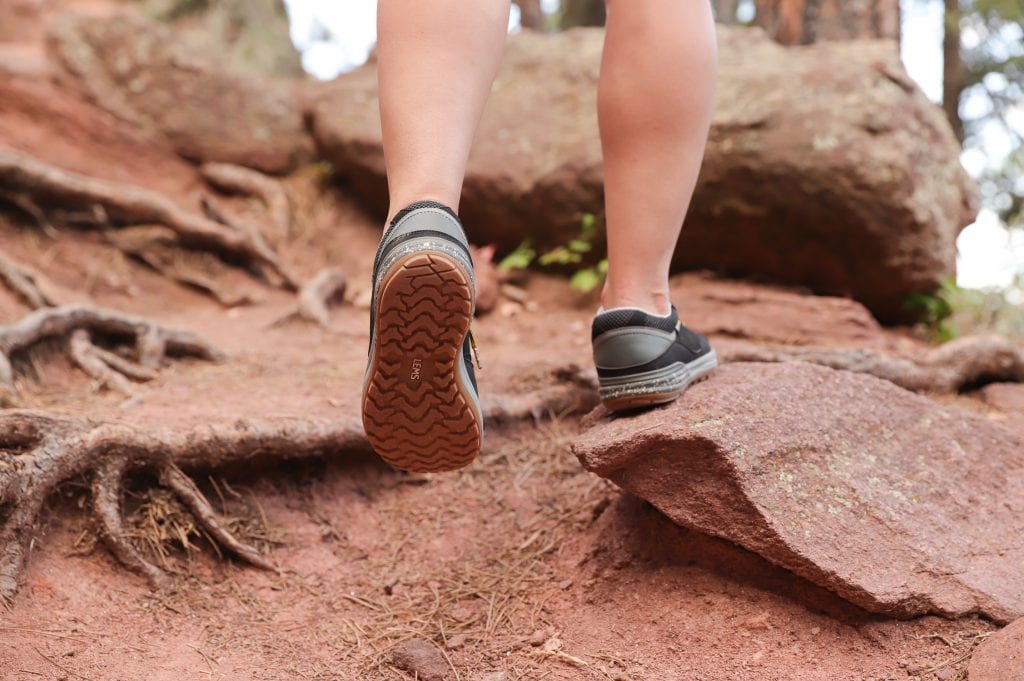
I am a big fan of companies that listen to feedback from their customers and use it to actually make changes to products! That’s exactly what Lems did when outdoor enthusiasts let them know that their women’s Trailhead shoes were not quite perfect yet.
I reviewed the first version of Lems Trailhead back in June. I enjoyed the shoe but did find it to be a bit narrow. A lot of Lems loyalists also found the shoes to be narrow, as well as stiff with its rock plate.
So, Lems took the shoes back to the drawing board. They redesigned them to make adjustments where needed while maintaining the functionality that attracted me to this shoe in the first place. The alterations range from practically non-noticeable removal of the bunion area overlay to ahhhhh-inspiring increases in toe box width (read the full list of changes HERE).
One difference from the original Lems Trailhead design is that the lacing system. It used to have two loops, but Lems reduced it to one to release pressure on the top of the foot. I noticed that with this change, the tongue has a bit more tendency to shift to the side. By paying a bit of attention when lacing up, I can ensure it stays where it should.
They also widened the toebox, but if you have wide feet, these may still be too narrow for you. Even with the increased width in the toe box this shoe is narrower than others in Lems product line.
Flexibility has increased from the first design to the second with the removal of the rock plate. There is adequate tread and cushioning on both of the designs to provide comfort while trekking. The biggest difference is your foot feels more of the impact and terrain with the newer version. I would limit this shoe’s use to walking around town or for day hikes where the added flexibility increases comfort. I appreciate rock plates in my shoes for backpacking to minimize foot fatigue on longer multi-day hikes.
These shoes have become the workhorse of my footwear. They are comfortable for the mundane mile-long walk to school with the kids in the morning, and stylish enough for travel to far-off places where we are on our feet exploring all day long.
I recently took them on a four-mile hike in the foothills of Boulder, Colo. I was pleased with their grip on the sandstone boulders we climbed over. The onyx color does have a tendency to show dust after hikes. But, I can are easily restore them with a quick wipe down. They also pair as easily with leggings as they do jeans or even a casual dress.